PARTHIANS APLENTY
Examining the Parthian army list found on the top of page 17 in DE BELLIS ANTIQUITATIS (Version 1.1, WRG, March 1995), it was noted that there were approximately a dozen “plausible contemporary enemies” that could be deployed to face a primarily cavalry force (horse archers and cataphracts, along with a few camels, perhaps). In order, these enemies were: Kushan, Kimmerian or Skythian, Later Seleucid, Early Armenian, Bactrian and Indo-Greek, Parthian, Han Chinese, Early Rhoxolani Sarmatian, Siracae, Iazyges or Later Rhoxolani Sarmatian, Pontic, Marian Roman, Early Imperial Roman, Middle Imperial Roman, and Early Sassanid. Checking these “plausible contemporary enemies” against the variety of armies found in the ‘Age of Empires’ section of the army list catalog in the Armati 2nd Edition rulebook, I decided on and then started preparing the following opponents for three planned solo wargames featuring Parthians: Later Seleucids, Marian/Caesarian Romans, and Sarmatians.
Orders of Battle
On page 34, Section 14.1 of the Armati 2nd Edition rules covers Core and Bonus Units, Bonus Unit Procedures, Veteran Units, and other related topics. “If larger games are desired,” so states the fourth full paragraph, “players should double the Core and Bonus Unit availabilities, and also double the Control Ratings and Core Army Breakpoint.” Having always had a preference for larger games, I turned to page M of the ‘Age of Empires’ catalog and proceeded to draft a sizable Parthian army. The following list shows the number, type, fighting value, protection value, and weapon(s) carried by the identified formations.
10 x LC (light cavalry) [key] 1[0]0 +1 Bow
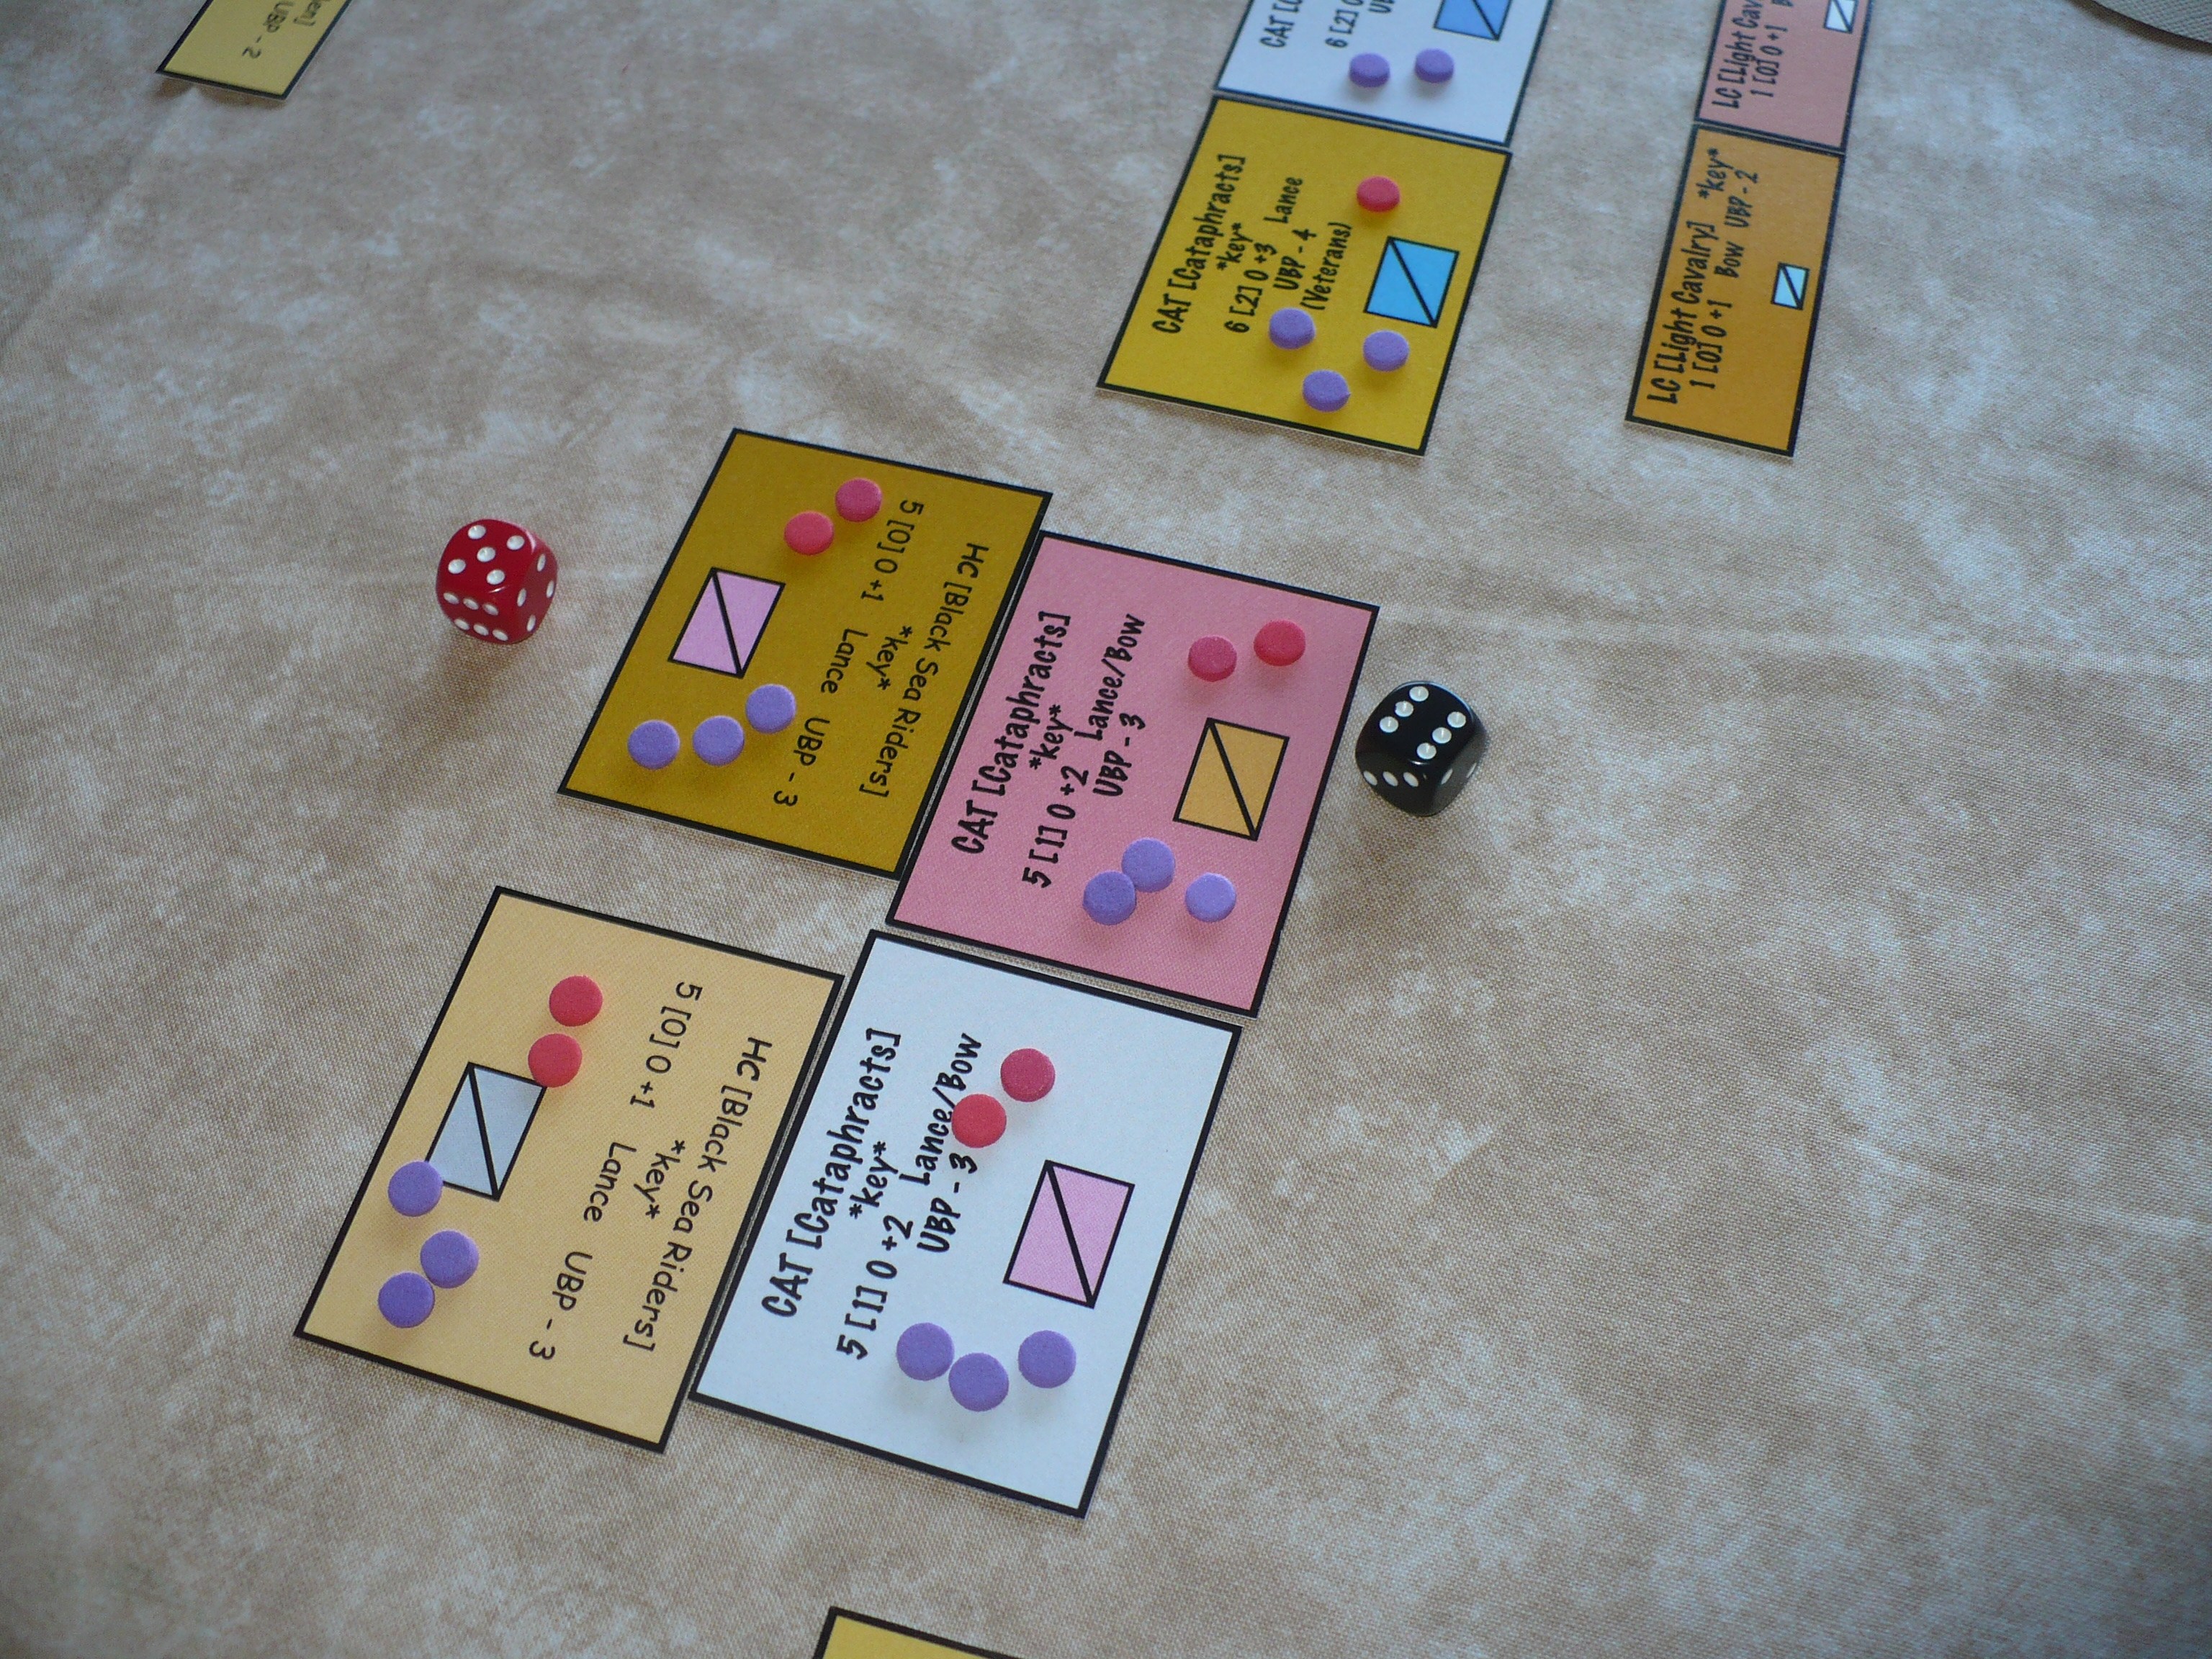
04 x CAT (cataphracts) [key] 5[0]0 +3 Lance [1]
14 x LC (light cavalry) [key] 1[0]0 +1 Bow 084 points
04 x CAT (cataphracts) [key] 5[0]0 +3 Lance 052 points
02 x CAT (cataphracts) [key] 5[1]0 +2 Lance/Bow [2] 028 points
02 x CAT (cataphracts) [key] 6[2]0 +3 Lance [3] 030 points
02 x CM (camels) [key] 3[1]0 +1 Lance 014 points
Veterans - Upgrade x 2 units 002 points / 200 points
Turning to page J, I selected my Later Seleucid army. This force included:
02 x PH (Argyraspids) [key] 8[1]1 +1 Pike
04 x PH [key] 7[0]0 +1 Pike
04 x LI (Peltasts) 4[1]2 +1 Javelins
02 x SI (skirmishers) 2[1]1 +2 Bow
02 x CAT (cataphracts) [key] 6[2]0 +3 Lance [4]
01 x SCYTH (Scythed Chariots) 5[1]0 +1 Sharp Blades 006 points
01 x EL (elephants) [key] 5[3]2 +1 Various 012 points
02 x LC (light cavalry) 1[0]0 +1 Bow 014 points
03 x LC (light cavalry) 2[0]0 +1 Various 021 points
01 x CM (camels) [key] 3[1]0 +1 Various 007 points
02 x HC (heavy cavalry) [key] 4[0]0 +1 Various 020 points
02 x HC (heavy cavalry) [key] 5[1]0 +2 Spears 024 points
02 x WB (Galatians) [key] 5[1]3 +1 Various 016 points
04 x SI (skirmishers) 3[1]2 +2 Javelins 008 points
02 x SI (skirmishers) 2[1]1 +2 Bow 004 points
02 x LHI (Thorakitai) 4[1]2 +1 Javelins 007 points
06 x PH [key] 7[0]0 +1 Pike 060 points
Veterans - Upgrade x 2 units 002 points / 201 points
The Marian/Caesarian Roman list is on Page K. As Caesar made plans for Parthia but never got a chance to carry them out (thanks a lot Assassinate Caesar Club . . .), I am going to exercise some historical license and say that the assassination plot was discovered and Caesar carried on after the various club members were dealt with. He would go to Parthia. Here is an idea of what the advance force might have looked like.
08 x COH (Cohorts) [key] 7[2]2 +2 Pila/Sword
04 x SI (Auxilia) 3[1]2 +2 Javelins
04 x LC (Armenians) 1[0]0 +1 Bow 024 points
02 x CAT (Armenians) [key] 6[2]0 +3 Lance 030 points
03 x LC (Moors/Allies) 2[0]0 +1 Various 021 points
05 x HC (Germans,
Gallic, Spanish) [key] 4[0]0 +1 Various 050 points
02 x SI (Auxilia) 3[1]2 +2 Sling 004 points
02 x SI (Auxilia) 2[1]1 +2 Bow 004 points
02 x LI (Auxilia) 4[1]2 +1 Javelins 014 points
04 x COH (Cohorts) [key] 7[2]2 +2 Pila/Sword 052 points
Veterans - Upgrade x 2 units 002 points / 201 points
The Sarmatian list on Page N completes the quartet of ancient armies for this experiment. Here is their order of battle for their planned meeting with the Parthians.
08 x HC (Black Sea Riders) [key] 5[0]0 +1 Lances
04 x LC (Young Men) 2[0]0 +1 Bow
12 x HC (Black Sea Riders) [key] 5[0]0 +1 Lances 132 points
03 x CAT (Southern Tribal) [key] 5[2]0 +2 Lance/Bow 042 points
03 x LC (Young Men) 2[0]0 +1 Bow 024 points
Veterans - Upgrade x 2 units 002 points / 200 points
Terrain
The Parthian army list provides 1 GR (gentle rise) for its Core Terrain. The Parthian commander can choose up to two more pieces or features for the look of his battlefield. Two additional GRs can be selected, or there could be a SH (steep hill) and or a patch of RG (rough ground). These three types of terrain comprise half of the available terrain features available in the Armati rules. The other terrain options include: open ground, woods, and stream. (To clarify: The category of “open ground” is not really a choice, feature or type; it is what is left after the other terrain features are selected and placed. To be certain, it seems unlikely that a wooded area or areas and a stream would find a place on a likely Parthian battlefield.) [5]
Initially, I considered recycling an idea, a terrain “table,” really, that would be used to determine the landscape design for each battle. A d6 or d10 would be rolled and the “table” consulted to find out which historical battlefield my tabletop would bear a faint resemblance to. After going back and forth on this issue for several days, weighing the pros and cons, etc., I decided on a “bare bones” approach. For all three of the planned scenarios, my tabletop would look like the terrain of Raphia, the well known and quite large battle that took place in 217 BC. [6] This “problem” being solved, I could focus more time and energy on testing ideas and tinkering with the rules-as-written.
Rule Tinkering
In the fourth or fifth paragraph of Section 14.1 of the Armati rules, it explains that for larger games, four aspects of the chosen armies should be doubled. However, only a “larger table is advised,” as opposed to a playing surface twice the size of the stated dimensions. On page 5 of the rules, there is a diagram showing the oddly specific measurements (in my opinion) for tabletops on which one plans to use either 25mm figures or 15mm figures. Though I do not use figures at all in my solo gaming projects, I have a preference for the smaller scale. Technically, if I were to double the 64-inch by 40-inch table diagrammed on the top left of page 5, I would need a playing surface 128 inches long and 80 inches across. Like many other wargamers, I simply don’t have the space. However, my extended table measures 126 inches by 45 inches, so an “argument” could be made for being able to double the required dimensions for a 15mm wargame. Adjusting the dimensions of the restricted zones, flank, and battleline sectors, I prepared a “model” battlefield with 6 inches of off limits on the extreme left, a left flank or wing sector 25 inches across, a center sector 64 measuring 64 inches, and then repeated the process for the right side of my table.
The three unit sizes are diagrammed on page 1 of the rules, and the figure basing dimensions for 25mm and 15mm figure scales are listed in a table on the bottom of the same page. Liking the look of Epic Size Units on my tabletop (even though they are two-dimensional instead of three-dimensional), I chose this form of representation. However, in order to make better use of the available, albeit modified space, I shrunk these 15mm Epic Size Units by 25 percent. As a result, Heavy Cavalry units would have a footprint of 6 centimeters by 4.5 centimeters, while Heavy Infantry units would have a footprint of 6 by 3.37 centimeters, and so on.
The third focus of my tinkering was the rules themselves. None of what follows can be called “original thinking,” as it was adapted, borrowed and or derived from as well as inspired by the sterling work done by others possessing greater wargaming experience in addition to a deeper knowledge/understanding of ancient military history. In brief overview, I made use of the veritable supply depot of ideas discussed and promoted by Mark Fry, Roy Boss, and members of the collaborative committee that produced almost 20 variants for the Armati rules. [7] To spare the reader the effort and time of wading through these various adjustments and amendments, I will simply list them here in an abbreviated format. Rather than go through the rulebook page by page and section by section, I shall use the ‘Sequence of Play’ as the framework for “hanging the sheetrock” of the following rule changes.
Missile Fire
> as unit sizes have been reduced by 25 percent, it makes sense to reduce missile ranges by the same amount
> all missile weapons will have 3 range bands: close, normal, and long
> units firing at close range will receive a +1 modifier to their die roll; units firing at long range will receive a -1 modifier to their die roll
> skirmisher units that score hits on targeted enemy formations do not inflict unit breakpoint kills but fatigue markers
> disordered (un-dressed) units may employ their missile weapons but with a -2 modifier
> missiles directed at the unshielded flank (typically the right flank) of a target unit will receive a +1 modifier
> missiles directed at the rear of a targeted unit will receive a +2 modifier
Evade Phase
> sides will dice for this as per usual, but winning the evade phase does not result in an automatic forfeit of the Move Option
> if a side wins the evade phase, it must subtract 2 from its die roll in the subsequent Move Option phase
Movement
> as the unit dimensions have been reduced by 25 percent, it is only logical that movement rates be reduced by a similar amount (this was achieved by making adjusted copies of the provided ruler for 15mm Optimal/Epic)
> LC (light cavalry) and HC (heavy cavalry) may interpenetrate each other [does not apply to CM (camels), EL (elephants) or M2CH (chariots - of any type)
> if evading LC cannot complete an evade move through a friendly formation of HC, then the LC is moved the additional amount to “clear” the formation, and both units are marked disordered
> SI (skirmishers), LI (light infantry), and LHI (light-heavy infantry) may also interpenetrate each other
> there is no disorder penalty for evading S, LI, or LHI; these units will not have an impact on friendly units of the same troop type
> friendly LI and LHI may interpenetrate friendly HI (heavy infantry) in the same way as LC and HC may interact
Melee
> attempts to break-off from a melee can be made prior to the resolution of melees
> units that can claim impetus no longer break an opposing formation on winning the initial melee
> units with an impetus claim will inflict a loss of 2 unit breakpoints and disorder on the targeted enemy formation
> disordered units will fight with a -2 modifier to their melee die roll
> breakthrough movement rates are doubled, and any contact/melee resulting from this move is resolved immediately
> the rout path for all broken/destroyed units is increased to 6 inches
> broken scythed chariots and elephants will roll a 1d6 to determine the direction of their rout path; these units do not always run away in a straight line
Shifting, rather abruptly as there is no real transition here, to a consideration of army deployment and command, I recycled an idea that has been used on a number of previous occasions. As a solo player, it struck me as impractical if not “goofy” to use a blind when setting up the armies for a battle or scenario. Drawing maps also seemed like a lot of unnecessary work as well. Plus, it would be difficult to avoid a certain degree of bias to say nothing of knowing how the enemy had deployed. So, the roll of 2d6 would decide, in general, how the opposing armies would arrange their forces for the planned battles. [8]
If I may attempt to use the Later Seleucids as an example. The order of battle selected gives this army 8 heavy divisions and 6 light divisions. A tally of the various troop types shows that they have 22 heavy and 19 light units in their army. (The single unit of scythed chariots is a “special case” or exemption.) Now then, turning to the division of my tabletop, I designated the following sectors:
> left wing (13 actual inches across)
> left flank (12 actual inches across)
> the left-center (16 actual inches across)
> the center-left (16 actual inches across)
> the center-right (16 actual inches across)
> the right-center (16 actual inches across)
> the right flank (12 actual inches across)
> the right wing (13 actual inches across)
Referencing the ‘Army Deployment Maps’ at the top of page 5 in the rulebook, it was noted that “only mounted, LI and SI” were permitted to deploy on the wings or flanks. The center was the “property” of HI, though all other types of units could also be deployed here.
At first, I toyed with the idea of drafting 12 different deployment diagrams for each army. On the day of or evening before the battle, it would be a simple matter of rolling 2d6 for each army and referencing the specified map when setting up the various units and formations. However, and to be honest, the prospect of drawing 48 different maps was not all that appealing. So, I toyed with the idea of developing some kind of “generic table” that would assist me in arranging the opposing armies. After a few hours of working on this, it seemed to me that I was making things more complicated. Consequently, the “deployment table scheme” was scratched. I did like the idea of the dice taking away a certain amount of unintentional bias, and I did like the way that opposing dice rolls could imitate the presence of an opposing player. So I tinkered with the table a little more.
Instead of putting together a “covers all bases” kind of table, I pulled back and determined that the dice would give me four basic choices or deployments. Here is the “final draft” of the revised deployment table:
3d6 result General Deployment Scheme for the Army
3-6 “Turn the Left” / Strength will be concentrated on the right. This does not
mean that the left will be undefended, but that 1 division containing a
maximum of 3 units will be allocated to the left wing and to the left flank.
Two divisions may be positioned in the left-center sector. The majority of
the army will be deployed to the right.
7-10 “Turn the Right” / Strength will be concentrated on the left. This does not
mean that the right will be undefended, but that 1 division containing a
maximum of 3 units will be allocated to the right wing and to the right
flank. Two divisions may be positioned in the right-center sector. The
majority of the army will be deployed to the left.
11-15 “Traditional Deployment” / Meaning that light cavalry will be placed on
the far wings, light infantry closer in, and skirmishers will screen the
center. Heavy cavalry will be placed on the flanks as well as in the center
as a reserve. Heavy infantry will be spread evenly across the four central
zone sectors.
16-18 “Defensive Posture” / Similar in many respects to the “Traditional
Deployment,” but 3 heavy divisions (1 of these has to be cavalry) will be
placed in the center-left and the center-right.
The armies being readied, the rules being sufficiently tinkered with, and the deployment “problem” being “solved,” I made preparations for the first of three planned engagements.
Parthians vs Seleucids
This first match was inspired by an article (more of an invitation or even a challenge, really) found in the May 1995 issue of Slingshot, The Journal of the Society of Ancients. In “The Editor’s Hobby-Horse,” Michael C. Grant shared some results from a campaign game played in the early 1990s by a Matt Pickard and his friends. Evidently, whenever the Seleucids met the Parthians on a tabletop battlefield, the Seleucids were either embarrassed, humbled, or thrashed. This happened seven times. I read with interest the subsequent and brief reports that were generated by this invitation/challenge (the Parthians were victorious in these battles as well), and as stated above, thought I might attempt something similar, however belated my staging. So, as the old year wound down and the new one approached at a crawl, I prepared two inexpensive but colorful armies and readied my extended tabletop for this contest.
Deployments
Both sides rolled for a traditional deployment. The Parthians would occupy the near long-edge of the fictional battlefield; the Seleucids would arrange their forces on the distant long-edge. Starting with the Parthians, they placed light cavalry on the wings. There were 4 divisions on the left (9 units total) and 3 divisions on the right (7 units total). The center of the army saw 4 divisions of heavy cavalry and camels (14 units) screened by 4 divisions of light cavalry (8 units). The Parthian general positioned himself on the right, behind the mixed heavy division containing cataphracts and camels.

Picture 1 / Looking down the Seleucid deployment from above their right, and looking down the Parthian deployment from their left. As per usual, the units are more functional and inexpensive and simple to fabricate than anything else. The “terrain” for this battle is also quite simple. The extent of the playing surface, the size of the opposing armies, and some tinkering with deployment rules produced lines of battle that were not contiguous. In fact, the Parthian formations seemed rather isolated from friends and neighbors.

Picture 2 / Taken from above the division or command closest to the Parthian general. There is a white d6 behind his stand, showing the Initiative Rating of the army. When divisions/commands are split, then this number will decrease. Anyway, the Parthian general rides behind 3 units of Cataphracts (CAT) and 2 units of Camels (CM). Two units of light cavalry (LC) screen the heavier formation.

Picture 3 / A view from high above the Seleucid army general’s location. His white d6 shows the lower Initiative Rating enjoyed by his formations. Two units of Seleucid Cataphracts are just to the right of the overall commander. There is a large pike phalanx in front of the general. The phalanx has a unit of elephants “attached” on is left flank, and there are some skirmishers spread across the front of the larger unit.
Shifting over to the more colorful and eclectic formations of the Seleucid army, it seems easier to describe their deployment by starting on one flank and moving across the line to the other flank. On the far left wing, the Seleucid command placed 3 units of light cavalry in a division. In the next sector, 2 units of heavy horse and 1 unit of camels were organized into a formation. The Seleucid sub-general was stationed with these troops. Next in line was a light division containing 2 units of Peltasts and 1 unit of Thorakitai (LHI). These nimble troops were screened by even more nimble skirmishers (2 units). A division of Galatian warriors (2 units) along with a squadrons of scythed chariots occupied the next sector. To their right was a powerful phalanx of 6 units. These pikemen had a troop of elephants attached to their left-most unit. The pikemen were screened by 2 divisions of skirmishers, each containing 2 units. In reserve behind the right side of this phalanx, 2 units of Cataphracts waited for orders from the Seleucid general, who sat astride his horse not more than 30 yards distant. A second phalanx, this formation also having 6 units—but deployed in depth, stood to the right of the first phalanx. These pikemen were screened by skirmishers (2 units). The Seleucid right wing was essentially a duplicate of its left, the exception being that the light cavalry division on the far right was made up of 2 units, not 3.
Summary
The Parthian right performed very well on the day. A group of 3 units of light cavalry let themselves be chased off the table by a division of 3 units of enemy cavalry and camels. The Seleucids paid a steep price. Half of their heavy cavalry was shot down, and the other unit was much reduced by effective volleys of arrows from the evading horse archers. By the end of Turn 6, the Seleucids only had these 2 units plus a unit of skirmishers in this sector of the field. The Parthians, in contrast, had 6 units of light horse, 3 units of Cataphracts, and 2 units of camels. Granted, it would take some time to reorganize these various units into a effective formation, but time was on the Parthians’ side.

Picture 4 / Again, looking down from above the Seleucid right and Parthian left. Both sides are moving their various formations forward. The Parthians have loosed an initial flight of arrows from a distance. These missiles landed without any effect.

Picture 5 / Taken from above the other side of the battlefield, this photo shows units from both sides drawing closer. There has only been ineffectual missile exchanges thus far. The Parthian light cavalry is wary, as they do not want to get caught “flat footed” and hurt or worse in the ensuing rounds of melee.

Picture 6 / The Galatian warriors are charged by a few units of Parthian Cataphracts. The red marker on the one Galatian stand/counter indicates a unit breakpoint loss from some effective arrow volleys by the Parthian light cavalry. (These units have withdrawn, but are visible on the far left of the frame.) The Cataphracts claim a “modified” impetus versus the Galatians. The melee dice result in an 8 for the Cataphracts and a 6 for the Galatian foot. The Galatians will lose 2 unit breakpoints, be marked as disordered, and will get a fatigue marker. The Parthians will get a fatigue marker.

Picture 7 / In another part of the field, another group of Cataphracts launches itself against a formation that is very different from Galatian warriors. Here, the Parthian Cataphracts have thrown themselves against a pike phalanx of pretty good troops, all of whom are deployed in depth. The Seleucid pikemen will be able to coordinate and cooperate in the melees against the very heavy cavalry. Even though the rules (QRS) informs that the Cataphracts will receive impetus, I wondered about this. The horse are charging pikemen frontally; the phalanxes are deep, and I believe the pike is longer than the kontos, so . . . Additionally, given the movement constraints of the rules, there was not a lot that the Cataphracts could do about their deployment.
The Parthian left did well enough, though not as good as the right wing. The Seleucid cavalry in this area of the field was effectively shot apart or so much reduced as to not pose a threat. The same could be said about their remaining units of light infantry. The Parthians had 9 units of light cavalry in the area and would be able to ride circles around the Seleucids, letting fly with numerous arrows as their galloping horses left large clouds of dust in their wake. The exception to Parthian rule on this wing was a strong phalanx of Seleucid pikemen. A formation of Cataphracts, under the command of the Parthian sub-general, had dared make a frontal attack. In a little longer than it takes to blink, the Parthians had lost two-thirds of their heavily armored and expensive Cataphracts.
The center of the fictional battlefield saw a similar contest between pikemen and Cataphracts. There was also a localized melee between Galatian warriors and more Cataphracts. Though not deployed in depth and not containing veteran units like the other phalanx, this division of pikemen held their ground and the Parthians paid dearly for a couple of rounds of fighting. The melee against the Galatians went much better, aside from the one very stubborn and or lucky unit of warriors that was decimated as well as disordered by the extra-heavy horsemen. Possession of the center sector was undecided, though it seemed that the Seleucids had a better claim. Six units of Parthian cavalry were in this area; 4 of them were horse archers. The Seleucids had 6 units of pikemen, a unit of elephants (much worse for wear as it had been attracting lots of Parthian attention), and 2 units of Cataphracts under the direct supervision of the Seleucid army general.

Picture 8 / In the approximate center of the field, 3 more units of Cataphracts attack another pike phalanx. This time, however, the Seleucid foot are not deployed in depth. Per the rules, the Cataphracts still get impetus, but the friendly pike units on either side of the melee are not able to do anything. Evidently, they just stand there and perhaps cheer their fellow phalangites on. Readers will note the elephant stand/counter on the left of the pike phalanx. The pachyderms did not play any role in the battle really, unless one counts being a magnet for arrow volleys from Parthian horse archers.

Picture 9 / Yet another section of the field where Cataphracts charge enemy foot formations. This particular contest is going to be much easier for the Parthians, as the horse and camel units are facing light infantry and light-heavy infantry. The Parthian general is in attendance, though he is not attached to any friendly unit and is not participating in the melee. The white die indicates the current Initiative Rating of the army; the maroon marble and gold dice indicate how many key units the Parthian general can lose before his army is broken.

Picture 10 / Three units of Parthian light cavalry exercised the “Parthian shot” during several turns while being challenged and chased by enemy heavy cavalry and camels. The Parthians whittled away at the enemy pursuers. (Each HC stand/counter has 2 red dots on it. One more red marker and that unit is destroyed.) The Parthians evaded for successive turns until they ran out of tabletop.

Picture 11 / After the first round of melee against the deployed-in-depth Seleucid phalanx. The Cataphracts have bitten off more than they can hope to chew here. Although, there was a bright spot when one of the units of Argyraspids made a poor roll and felt the true impact of Cataphracts across their not-quite-ready front.

Picture 12 / Nearly the end of the Seleucid light infantry in that one sector of the battlefield. With some good dice, the Parthians have managed to damage and disorder the enemy foot. The camels, free of any obstruction, have made a divisional split and continued forward. This has reduced the Parthian Initiative Rating, but given the state of things on the table, it was judged an acceptable risk/move.
An “educated projection” was made after six turns of play, and it was decided that the Parthians would be awarded a tactical victory—as opposed to a major or strategic one. Their cavalry could have combined to eliminate the Seleucid Cataphracts, but at some cost. As most of their own Cataphracts had been roughly handled (either by the enemy or by their own officers— frontally charging a pike formation?—the very idea!), this left the horse archers to annoy, harass, encircle, and loose arrows into the slower moving pike formations.
Thoughts
With the perspective afforded and perhaps even additional knowledge gained in the almost 48 hours since calling the game and clearing the table for the next scenario on this agenda, I should like to offer some comments and thoughts, unorganized though they may be, about the contest. First, some remarks about the deployment table and rule variants.
The dicing for the general deployment scheme certainly took a lot of “weight” off my aging shoulders, but I wonder about the accuracy and the historical aspects of this. Yes, each sector on each side of the tabletop contained troops, but with this deployment there were more than several gaps in the formations of the opposing armies. Based on what I currently know (or think I know) about ancient military history and battles, it seems that armies were arranged for combat so that their line of battle was contiguous and self-supporting. It was not similar to a slice of Swiss cheese, with holes of various sizes here and there. So, I am wondering if there is a way to “fix” the dispersion that seems to be the result of using the deployment scheme table.
As for the rule variants, well, admitting a large measure of subjectivity, I think these worked well. I did, however, start to wonder about the evade phase and its processes. I wondered if this separate phase could be added to or folded into the movement phase of the game turn sequence. If one accepts the notion that light troops, whether on foot or mounted, would avoid contact and combat with any heavier troop types, then it seems to me that evading should be almost automatic. The revision of this sub-procedure is in very rough form at the moment, but I am thinking about a d6 being rolled to determine how many inches the evading body remains away from the advancing, approaching, and or threatening enemy. I am also thinking about a “caught flat-footed” die roll, where if it is failed, the unit that wants to evade is caught and destroyed. The minor question on this point is whether or not the advancing unit should stop at the point of contact or proceed through the “flat-footed” enemy unit like a scythe through ripe wheat. I am hoping to have something sketched out before the next scenario is set up.
Looking at the “big picture” of playing the Parthians, it seems to me that this army is a dual threat as well as a double-edged sword. In the recently concluded contest, the Parthian light cavalry did well, using the mobility and firepower to annoy, disrupt, and in certain cases, destroy the targeted enemy formations. However, when facing better armored cavalry and solid blocks of foot, their effect was reduced. The Parthian Cataphracts, once deployed, were like guided missiles, a “fire and forget” kind of formation. In the scenario just staged, it was a grave tactical error to commit the Cataphracts frontally against Seleucid pike phalanxes. There was some teamwork with the Parthian horse archers and their much heavier brothers, but limited room did not permit the Parthians to “soften up” the enemy foot units for a decisive charge by the Cataphracts. Here, I wonder if there might be a way to “telescope” time on the tabletop. I wonder if another table might be warranted, one where the cumulative effect of arrow volleys by “dancing” units of horse archers are indicated.
I am also wondering if I should adjust the movement rules a little for the Parthians. Perhaps allowing them to wheel 4 scale inches instead of just 2 would give the cavalry formations more of a “fluid” style or ability.
While preparing for this first scenario, I looked up “Party in Parthia,” a very amateur battle report submitted—in 2014—to a particular forum on The Society of Ancients website. It was interesting and thought-provoking to review the comments this report generated. There was a note from the late (and great as well as encyclopedic, in my opinion) Patrick Waterson, wherein he cited passages from ancient authors about the interaction between Romans and Parthians. There was Mark Grindlay’s observation, based on experience, which read: “They [Parthians] don’t give a great game, unless your opponent allows it. Basically, either your shooting dice are above average and the other guy cant [sic] touch you, or they are below average and you watch the game go by waiting for mistakes and luck.” Dr. Paul Innes, a former and excellent editor of Slingshot, weighed in on the conversation, echoing Mark’s comments with: “I remember using Parthians under Armati in the dim and distant past and you’re right, it was a real struggle.” This accomplished gentleman-wargamer also posted a link to an eye-catching campaign-based game featuring Parthians. Please see and prepare to be impressed: http://caliban-somewhen.blogspot.com/2014/08/second-outing-for-parthians.html.
In summary then, an OK wargame or scenario that seemed fairly historical if not plausible. There’s much work, I mean tinkering, still to be done. That said, I certainly don’t want to complicate things. Always a balancing act this tinkering!
Parthians vs Romans
Some eight years having gone by since I last campaigned in Parthia, I figured it was well past time to return and see if I could repeat the success I had leading the Romans into battle.
The terrain for this fictional field of battle was rather sparse. There were some gentle hills framing the opposite lower-left and upper-right of the table, and there was another gentle hill in the approximate center of the arid plain. Next to this slightly elevated piece of ground, there was an oasis.
Prior to deploying the opposing armies, I drafted a few changes to the evade rules and sub-phase of the game move sequence. First off, there would be no distinct evade phase. If both sides had units that they want to evade, withdraw, or retreat from a dangerous position, they could do so. Evading would not have any effect on the Move Option sub-phase. The work-in-progress rules were as follows:
- Any unit wanting to evade had to roll 2d6. If they scored a 2 or 3 (no modifiers applicable), then for some reason, the unit was slow to respond to orders or the threatening enemy. The unit would be frozen in place.
- If the die roll was 4 or better, then a second die roll was required. This time, it would be a single six-sided die. On a roll of 1 or 2, the evading unit would maintain a “cushion” of 2 inches between the attacker and itself. A roll of 3 or 4 would provide a “cushion” of 4 inches, and a roll of 5-6 would allow the evading unit to establish a “cushion of space” measuring 6 inches.
- Evading units would always have their front towards the enemy.
- A successful evasion did not mean that it would happen again in the battle. Each time a unit wanted to evade, it would have to roll 2d6.
Deployments
The Parthians took the near long-edge of the fictional battlefield and, having rolled for a traditional deployment, arranged their various formations with light cavalry out on the wings and the heavier units of cavalry and camelry in the center sectors. In more detail, from their right to left, this was how the Parthians prepared themselves to meet the Roman invaders. Guarding the right flank of the army were 4 divisions of light cavalry (8 units total). Closer to the center, there was a division of camels supporting another division of light cavalry, and then further left, a division of Cataphracts (the lance and bow variety) who were supporting or working in tandem with another division of light cavalry. The strength of the Parthian army was found in the center-left and or left-center sectors. A division of Cataphracts (2 units of the really good ones flanked by units of just good ones) faced the rising ground in the approximate center of the desolate plain. The 4 units of Parthians were screened by a division of 2 units of light cavalry. The “hammer” of the Parthians was positioned to the left of this combined formation. Six units of Cataphracts in a single command (division) were screened by another division of light cavalry. The general of the Parthian army rode behind this veritable wall of Cataphracts. The left wing of the Parthian army mirrored the right. In this sector, there were 4 divisions of light cavalry (8 units total).

Picture 1 / A long view of the table taken prior to the start of the scenario. The point of view is from behind the left wing of the Parthians and looking diagonally towards the Roman left. The sparse nature of the ground can be seen; the deployment of the opposing forces is also fairly evident.
Across the sun-baked ground (there had not been a decent rainfall for more than 18 days), the Romans prepared for battle. Their dice also dictated a traditional deployment. Starting on their far right wing, this sector or these sectors as there were two of them, were assigned to the Armenian contingent. The light cavalry held the outside; the Cataphracts would operate on the interior. To the left of the Armenian Cataphracts there was a division of Roman Auxilia (skirmishers). These 4 units carried a number of light javelins. To their left, the main Roman battle line began. The legionaries or cohorts were spread across the center sectors in 7 divisions, 5 of these contained 2 units and 2 divisions consisted of just 1 unit. The approximate center of the line was screened by several units of skirmishers armed with bows or slings. The right-center of the line was supported by a unit of German heavy cavalry and a unit of Spanish heavy cavalry. The overall Roman commander was also located in this general area. The left flank of the Roman position was tasked to 4 divisions. Three of these were cavalry: 1 formation of light cavalry and 2 groups (3 total units) of Gauls. The fourth division contained 2 units of light infantry auxilia. The Roman sub-general was responsible for the left wing as well as the left-center.

Picture 2 / Taken from above the oasis, which was near the approximate center of the field. The Parthians won the race to reach this feature as they were on fast-running horses. The Roman skirmishers (bowmen and slingers) would have to wait for the Parthians to evade before they could make a claim on the oasis.
Summary
The Roman left wing units were subjected to arrow volleys shortly after the battle commenced. Braving the rain of missiles, the Allied light cavalry and the Gallic troopers gave chase. The Parthians gave ground, turning frequently to loose another ragged volley of arrows at the pursuers. Dozens of light and heavy cavalrymen were toppled from their mounts. As running room ran out, the Parthians being chased by the heavy Gauls decided to quit the field. The Parthians being chased by the Allied cavalry turned and fought. The Parthians lost a few score but inflicted more damage on their opponents.

Picture 3 / Taken immediately after Picture 2, but from a different perspective. The Roman cohorts are advancing, slowly, but there are gaps in their line.
In the broader center of the field, Parthian camel troops had engaged some Roman heavy infantry and, after a number of volleys that left the shields of the legionaries looking like porcupines, the Cataphracts made their charges. The Parthian dice were rather poor; one could also describe their melee rolls as pitiful. The Roman cohorts stood firm, cutting down Cataphracts left and right. Before more of his armored and expensive to maintain troopers were laying face down or face up on the ground, the Parthian general ordered his bloodied formations to break off contact with the apparently untouchable Romans.

Picture 4 / The Cataphracts are committed near the oasis. The first round did not go that well for the Parthians. The Roman heavy infantry were not impressed by their attack. As the situation developed, the Romans brought up their German and Spanish horsemen to even the odds a little. The dice show the results for the first combat in the second round of fighting. The scores are even, so both units will earn a fatigue marker and take a loss.

Picture 5 / The Parthian general urges on his Cataphracts. The Romans do not panic, however, and start carving into the enemy formations. (Notes: The red marker on the Roman cohort was the result of some lucky shooting by a unit of Parthian horse archers. The generals of both armies are in this fight, or at least supervising what takes place. Each general has a d6 showing the current Army Initiative rating, and a 12 or 20-sided die showing the number of key units that need to be lost before the army’s morale cracks.)
On the Parthian left, several units of light cavalry were tasked with keeping the Armenian Cataphracts occupied. They did well enough, but lost one-quarter of their strength in the process. Elsewhere in this sector, other units of Parthian light cavalry were able to disperse their opponents. Two units of Cataphracts were able to bypass the line of melees where their friends were being chewed up and spit out by the Roman heavy infantry, but their immediate objective was not clear. Furthermore, these formations were not as maneuverable as the horse archers, so wheeling about and or changing direction was going to take some time. At the end of six turns of play, the Romans appeared to be in control. To be certain, they had lost some skirmishers and other light units. The condition of the cavalry on their flanks was not that great. However, the legionaries had barely been scratched in their rounds of fighting the enemy Cataphracts. In fact, a quick check at the conclusion of Game Turn 6 informed that the Romans had not lost a single key unit. The Parthians, in stark contrast, had lost 10 key units, 4 of these were Cataphracts.
Instead of continuing the scenario, a critical if also subjective assessment was made of the tabletop. The Parthian right wing had 7 units of light cavalry and 2 units of camels. Most of the light cavalry formations were wounded and marked with fatigue. They would not be able to stand up to the 3 units of Gallic heavy cavalry, although these squadrons were reduced by missile casualties as well. The Parthian horse would, perhaps, be able to attrit the Roman heavy infantry, but the legionaries could pursue (however slowly) the Parthians. The camels were being reduced and it was very apparent that these animals and their riders would not be able to do anything substantial against the Romans.
Over on the opposite side of the field, 3 units of Parthian light horse were being chased off the table by 2 units of Armenian Cataphracts. At the same time, near the Roman long-edge of the battlefield, 2 units of light cavalry and 2 units of Parthian Cataphracts were operating freely. (There were some Roman auxilia/skirmishers around, but . . .) The prediction was that the Armenians would push 3 units of Parthians to a point of no return. The 4 units of Parthians roving around in the Roman right-rear would need time to reorient themselves before they could, possibly, have an impact on the course of the general action.

Picture 6 / The Moors have chased the Parthians all the way to the edge of the table. Finally, the Moors can take a measure of revenge for the damage caused by numerous Parthian volleys.

Picture 7 / Way over on the opposite flank from the Moors and Gallic heavy horse, damaged units of Parthian and Armenian light cavalry come to grips. The dice rolls indicate a draw, so both units will remain on the table, though both will not be exhausted from all the riding, loosing of arrows, and crossing of swords.
In the center of the table, 8 units of Roman heavy infantry and 2 units of heavy cavalry faced 6 units of Parthian light cavalry and 4 units of bloodied and bruised Cataphract cavalry. Though their rate of movement was slow compared with the Parthian mounted formations, the Roman cohorts were pretty much unstoppable. They were also fairly maneuverable, so possible threats from the flank or rear could be addressed. If the weakened Cataphracts attempted another charge against the solid Roman line, the Spanish and or German heavy cavalry could move in on an open flank and cause serious problems for the Parthian formation.
Based on this review of the status of the field, and noting that the Parthian general had only 6 key units remaining in his army morale bank account (compared to the Roman balance of 9 key units - unchanged since the start), the decision was made to end the contest. The laurels of victory were awarded to the Romans.
Thoughts
Although this was only the second scenario wherein both sides were required to deploy in a traditional manner or way, I wondered if I might revise that deployment table so that the arrangement of opposing forces was a little more interesting or at least different. I also thought about ways that I might change or improve the current draft of the table so that there were not so many gaps or holes in the final deployment of each army.
Stipulating that the following assessment is subjective, I thought the revised evade procedures worked quite well. Yes, there was some extra dice rolling, but this was judged acceptable for the perceived streamlining of the overall process. There were also some additional questions and situations that came up during the testing of these draft scenario specific rules, but again, things seemed to go fairly well. To be certain, a lot more work is needed on this idea.
Acknowledging the recorded disaster that was Carrhae, this wargame featuring Romans and Parthians seemed fairly historical. The Parthians were much more mobile but appeared to lack the required “hitting power” when needed. Then again, perhaps this was a result of poor leadership? The Romans really should be subjected to barrages of arrows before committing the Cataphracts. On the other side, the Romans (mostly infantry with some cavalry) were more solid while also possessing a certain degree of flexibility. The legionaries could not realistically hope to catch any of the Parthian horse archers, but their formations, working together, could act as a kind of broom and sweep the Parthians off the field/table. A final note about the combats between the Cataphracts and the Roman cohorts: With regard to the FFV (frontal fighting value), the Romans had a +2 advantage. Furthermore, the infantry will not tire as quickly as the enemy cavalry. These variables are or were, it seems unnecessary to remark, rather substantial.
Parthians vs Sarmatians
Having taken the time and effort to draft a “deployment table” that might facilitate solo play, and having reviewed a variety of rule variants in addition to adding my own, for this third and final scenario, I decided to ignore or set aside most of that “work.”
The size of my table was reduced from 10.5 by 3.75 feet to 6.5 feet by 3.75 feet. The terrain was arid plain or desert-like. There were hills or elevated ground positioned in three of the four corners of the fictional battlefield. There were seven “pieces of terrain” scattered around the the playing surface. (Pieces of terrain is set off by quotation marks, as these were not actual or “true” features that would impact movement, missile fire, melee and line of sight. Rather, these seven irregularly shaped pieces of specialty paper and other material were employed to break up the comparatively bland and single color landscape.
Deployments
The Parthian army lined up on the near long-edge of the tabletop. Their left flank or wing was assigned to 14 units of light cavalry, each unit deployed in depth, and these units were arranged into 7 divisions. The Parthian sub-general was over on this flank. The center and right of the Parthian army saw 4 divisions of Cataphracts and camels (the camels were way over on the right) screened by 5 divisions of light cavalry (10 units total; 2 units in each division). The general of the Parthian army was in the approximate center of the field, in position behind the left-most unit of Cataphracts in a division that contained 8 units of these heavily armored riders and horses.

Picture 1 / Looking down the field from above the Parthian left and Sarmatian right. The uncluttered nature of the “model” battlefield is readily apparent. The Parthians have screened their Cataphracts with units of light cavalry. The Sarmatians do not possess a lot of light cavalry, so their heavy cavalry formations and units are more exposed.

Picture 2 / A close up from behind the position of the Sarmatian army general command stand, The white die shows the Army Initiative; the red and black dice show the number of key units that can be lost before the morale of the Sarmatians falters and then collapses.
Just over 4 light cavalry moves (at full gallop) across the simple but functional terrain, the Sarmatian host prepared for battle. Seven units of light cavalry were spread (very thinly, it must be said) across the entire front of the army in 6 divisions. The strength of the Sarmatians was deployed in 8 heavy divisions. The majority of these formations contained 3 units of Black Sea Riders. The Southern Tribal Cataphracts were on the right of the army, just slightly forward of the Sarmatian sub-general. Like the Parthians, the Sarmatian general positioned himself in the approximate center of his all-mounted army. Unlike the Parthians, the Sarmatian commander placed 2 divisions of heavy cavalry in reserve.

Picture 3 / On the opposite side of field, the Parthian army general rides behind a unit of veteran Cataphract cavalry. The white die shows the current Army Initiative Rating; the red and gold dice indicate the number of key units that, if lost (i.e., destroyed or routed), will result in the Parthians quitting the field. The protective screen of light cavalry horse archers is evident.

Picture 4 / The left wing of the Parthian deployment was crowded with divisions of light cavalry deployed in depth. The Parthian sub-general was responsible for command and control in this sector of the field.
Summary
Unlike the previous scenarios, this contest featured cavalry and camels only; there were no foot elements present on the tabletop. As might be expected, with the various fast-moving cavalry formations deployed as far as the eye could see, battle was swiftly joined. It was also swiftly resolved.
On the Parthian right, the horse archers and camel units collaborated to frustrate Sarmatian efforts to turn this flank. The opposing units of light cavalry, temporarily lacking a better description, tore each other apart. The Parthian camels played a short waiting came and then committed to joining the main melee that stretched across the field.

Picture 5 / Early stages of the engagement showing the opening moves made by both sides. The red arrows mark the direction of advance for the Sarmatians; the yellow arrows indicate the projected route for the Parthian light cavalry and their supporting Cataphracts.

Picture 6 / Another view of the opening moves of the battle, this time taken from the Sarmatian left and Parthian right. The near absence of a Sarmatian light cavalry screen is quite apparent. Their heavy cavalry had better charge in right away to close the distance and avoid time spent under a shower of enemy arrows.
Over on the Sarmatian right flank, their Cataphracts proved unstoppable. This was a given, as these extra-heavy horsemen faced only Parthian light cavalry. The Parthians let fly with arrows and scampered away. Other units of Parthian horse archers, not directly in the path of the enemy Cataphracts, wheeled and moved, moved and wheeled, to buzz about the flank and rear of the enemy cavalry like so many angry wasps. Somewhat surprisingly, the Sarmatian Cataphracts proved more capable with their arrow volleys than the Parthian horse archers. In fact, if two more turns had been played, 4 or 5 units of Parthian light cavalry would have been broken by enemy missiles or chased off the battlefield by the thundering approach of a powerful group of enemy cavalry.

Picture 7 / The opposing lines are now within missile range. The Parthian light cavalry will loose as many volleys as they can to soften up the enemy formations before the heavy cavalry units on each side charge into melee.

Picture 8 / Taken from behind the Parthian center-right, showing the poor results of the first volleys of arrows. Out of 12 participating units shown in this photo, only 4 were hit by missiles. (These units are marked with a red dot, which is a visual indicator of 1 unit breakpoint casualty.)
In the center of the field, the Parthians were able to get off one arrow volley before having to withdraw behind their supporting Cataphracts. This volley had very little impact on the advancing line of Black Sea Riders. At the risk of embellishing the situation, when the two lines of cavalry met (the Sarmatians moving at speed, the Parthian Cataphracts at more of a slow trot), the collision was heard all the way to the Nile. While the impetus of the Sarmatians was impressive, the armor, weight, and die rolls of the Parthians were better. Casualties were inflicted on both sides, and fatigue markers started to pike up on the engaged units. However, after a few turns of fighting, holes started to appear in the Sarmatian line. Breaking off the various local contests was considered, but the risk of not being able to control the retreat was judged too great and so, hope was placed in the laps of the dice gods. Unfortunately, these fickle deities did not smile upon the Sarmatians. The Parthian Cataphracts, though exhausted by the intense fighting, were able to chew up the weakened units of enemy heavy cavalry. Rather than play to the determined and inevitable end, the Sarmatian general, still on his splendid steed, decided to concede the tabletop with a single key unit remaining in his army’s morale bank.

Picture 9 / The Sarmatians have charged into contact along a significant portion of the Parthian line. The Parthian light cavalry let fly with another volley of arrows, but anxious about the expected enemy advance, these missiles did not find a lot of targets. Fortunately, the Parthian light horse were able to withdraw (i.e., evade) behind the wall of friendly Cataphracts.

Picture 10 / The Sarmatians, having won the Move Option, decided to resolve the first round of melees on starting on their left and moving right down the line. In as much as the first melee roll signals what kind of battle this will be, the fighting units inflict a casualty on each other. (Frontal fighting value of 5 plus a die roll of 5 equals 10 for the combat score.) Both units will also receive a fatigue marker. There will be no new die for the Cataphracts against the next Sarmatian unit, however. There will be no additional fatigue marker for fighting two enemy units. The Cataphracts do not get to inflict damage on the second Sarmatian unit, as they have already damaged the first unit of Sarmatians.

Picture 11 / Looking down at the morass of melees in the center of the table and their various impacts. Many of the units on each side are exhausted (indicated by the 3 purple markers) and almost as many are “this close” to being broken (indicated by the red markers on each stand, base, or counter). As can be plainly seen, the Sarmatians are being roughly handled by the Parthians.

Picture 12 / Over on the Sarmatian right flank, 3 units of Cataphracts give chase to 4 units of Parthian horse archers. As this local action develops, a number of Parthian light cavalry units use their better mobility and take advantage of the open ground behind the enemy Cataphracts.
Picture 13 / A close up photo of the melee direction being resolved in the center of the table. Both engaged units are tired (each formation has 3 purple fatigue markers), and both units are on the brink of routing (each has 2 red markers; each has a limit of 3 red markers). As both units are exhausted, their melee value is reduced. However, in this case the negative modifier can be ignored and a simple die roll determines the victor. As the dice show, it was a very close contest, with the Parthian Cataphracts winning by 1.

Picture 14 / Evidently, the luck followed each side to the next melee to be resolved. Once again, the Parthians manage to secure a dramatic, “to the finish” win.

Picture 15 / An overview of the center of the field showing the status of the Parthian formations and what is left of the Sarmatians. The larger dice show the key units left in each army’s account. At the end of this game turn, the Parthians had a 9-to-1 advantage. Rather than play another turn, the Sarmatian general conceded and rode off with what survivors and supports he could find.
Thoughts
To be certain, I do not have enough data, but from what I have seen so far, the revised evade rules work fairly well. Of course, I need to do further testing and tinkering. I cannot recall if I have “commanded” Sarmatians on my table. They do seem to be a fairly one-dimensional army, at least as presented in the Armati lists. [9]
Much like the other contests, this fictional engagement was completed rather quickly and conceded before the “official” result was determined. Even though I do not play against a living opponent, I think there is a definite impact on attitude and morale when your army is down to its last key unit point. In some ways, I suppose that conceding before the actual defeat is a sign or indication of character, but I would suggest that there are dozens of historical battles where the fighting was over before the first shot was fired or very shortly after the missiles and shells started flying.
Three solo wargames using Mark Grindlay’s “corrected” Cataphracts gave me some experience and exposure to the strengths and weaknesses of deploying various types of extra-heavy cavalry on my table, but I do not think I have enough data to make an informed decision. That said, I do think the variation in Cataphract unit types and associated abilities are interesting, well-reasoned, and add a certain level of chrome and or color to the recently completed scenarios.
Reflection
Reviewing these three scenarios and looking over the trio played using GRAND TRIUMPH!, I think it would be fair to say that my preoccupation with Parthians was a pretty positive experience. In addition to winning five of the six battles, I had a chance to experiment with an army that I don’t typically use on my tabletop. I do not think that I am a Parthian “convert” though. Even with my limited but very successful track record of commanding horse archers and Cataphracts, I do not think that I am a cavalry general, let alone a cavalry general to be feared. I find that I am more comfortable commanding balanced forces. I do know that I have an attraction to “interesting” armies such as Carthaginians and Seleucids. I also recognize that I am somewhat partial to armies containing elephants, like Carthaginians under Hannibal, Seleucids, and Indians. Then again, there is also something very appealing about being in command of a number of Roman legions . . .
Focusing on these three Armati games, I think the rule amendments worked rather well. I think the “deployment table” also worked fairly well, even if the games were somewhat the same with both sides using traditional deployments. At the same time, it occurs to me that one can do too much, obviously, with rule amendments. In the search for additional authenticity and so forth, it seems that one can go too far and wind up complicating or confusing the various procedures and or complicating the game turn sequence. So, while these three Armati scenarios went well enough and were fun to play (acknowledging that “fun” is a very subjective word), I am not sure that the Parthians had sufficient room to exercise their historical tactics, or their tactics as I understand them. A case could be made that the “fluid” tactics of the Parthian horse archers were not sufficiently represented on the three tabletops.
In summary, not one of the six scenarios played was a perfect wargame. However, I was engaged and entertained by the time I spent with this all-mounted army. I also think that I gained a little more knowledge about Parthians. If I am able to attend a future convention or show, I should like to find a tabletop upon which actual miniature Parthians are deployed. (This may prove to be a long search, however.) I would not sign up to play, but I would carefully observe without getting in the way. If the opportunity presented itself, I would certainly bend-the-ear of the Parthian player-general or generals.
Notes
- In “Cats May Look at Kings” (Slingshot 259, July 2008), Mark Grindlay considers cataphract cavalry and suggests how they might be better represented with the Armati 2nd Edition rules. In the “language” of Armati, cataphracts (CAT) are key units, have a frontal fighting value of 5 but 0 to the flank/rear and in special situations, are subject to obligatory charges, have no impetus against heavy infantry (HI), and have four (4) unit breakpoints.
- This representation of cataphract cavalry was inspired by comments made by Roy Boss in Reply #12 to my “Party in Parthia” battle report posted to the dedicated forum on The Society of Ancients website on August 16, 2014. These units were not obliged to charge and had the typical number of unit breakpoints for cavalry formations.
- This is how cataphracts are normally represented in Armati. These well-armored formations will have a unit breakpoint of 3.
- For the cataphracts employed by Later Seleucid armies, I am opting for the traditional representation.
- An informal survey or study was taken of a number of relevant Armati articles published in Slingshot, The Journal of the Society of Ancients. Terrain did not appear to be an overriding concern in the various scenarios examined. In the articles oriented to a consideration, critique or review of the rules themselves, terrain was again, not given a priority rating. It might well be a logical leap here, but it’s interesting to compare and contrast the terrain “treatment” in the 2003 Armati 2nd Edition rules with the 3rd Edition of L’Art de la Guerre (ADLG), published in 2014. The former identifies 6 types of terrain; the latter lists 13 terrain features, organized into 4 broad types.
- Here are a few links where one might find out more about the actual battle: https://en.wikipedia.org/wiki/Battle_of_Raphia, http://www.arsbellica.it/pagine/antica/Raphia/Raphia_eng.html, and http://turningpointsoftheancientworld.com/index.php/2018/08/25/battle-raphia/. Here are a few more links about attempts to refight Raphia on a tabletop: https://www.beastsofwar.com/liveblogentry/fancy-playing-out-the-battle-of-raphia/, http://shaun-wargaming-minis.blogspot.com/2016/12/battle-of-raphia-217bc-using-ancients.html, https://fanaticus.boards.net/thread/546/refighting-raphia-all-ellies, and https://bigredbat.blogspot.com/search/label/Raphia.
- I combed through the ‘Scenario Specific Rules/Changes’ found in Mark Fry’s excellent Battle Day Report “Chalons 451 AD - With Epic Armati,” which appeared in the July/August 2013 issue of Slingshot. I have a copy of the posted reply on the subject of impetus and mollifying its normal effect from the venerable Roy Boss. (This is from late May 2014.) I also dug up a PDF copy of the work-in-progress rule variants taken from the Armati Yahoo Group. The date on this cornucopia of material is early September 2008. The “keeper” of the variants is a Rodger (last name Williams ?). His screen name at that time was “rodger1uk.” It would also be fair to say that I have been influenced by other sets of rules as well as ideas and items stumbled upon by chance while “surfing” the Internet.
- Section 4.0 on page 5 of the rulebook explains: “The Army Deployment is the initial unit dispositions. These are drawn (sec. 2.3) on the battlefield map, or players may Deploy behind a “blind” before play begins. After the Deployments are revealed the game begins with Turn One.” For additional information about this procedure or procedures, please see Daniele Varelli’s “The Parthian Shot: A Classical Match-Up using Advanced Armati Rules,” in the September 1999 issue of Slingshot. The “Glasgow Armati Battle Reports” article, by the triumvirate of Mark Grindlay, John Bradley, and Vincent Auger, in the May/June 2015 issue of Slingshot, is also helpful. There is also a pretty cool/good YouTube video of an Armati game showing this process. It is a Command Combat Battle Report from September 2016, and the title is: “Armati - Vlad the Impaler and allies versus Ottoman Turks.” The use of the blind starts at around 4:10 and runs through 4:50, approximately, in the 25-minutes long video.
- I did a little digging around in the 333 PDF issues of Slingshot (approximately 55 years worth of reading and reference) that I have stored on my computer. (After some back and forth, I decided to invest in this resource offered by The Society of Ancients. Please see https://www.soa.org.uk/joomla/downloads.) I read with interest, Neil Hammond’s “HAVE LANCE, WILL CHARGE - Sarmatian Armies Under DBM,” which appeared in the September 1993 issue of this long-running journal.
No comments:
Post a Comment