PARTHIAN SHOTS
Taking a break from my current library book, [1] I flipped through the pages of Professor Philip Sabin’s LOST BATTLES - Reconstructing the Great Clashes of the Ancient World as a I broke my fast early one morning. After skimming the analytical passages covering Gabiene, Gaza, and Sellasia, three battles I confess to not being very familiar with, I turned to the “Rome Moves East” chapter and found myself reading about the Roman disaster that was Carrhae. Courtesy of Warfare in the Classical World and other sources, I was not completely unfamiliar with this two-day as well as one-sided engagement. For a few moments, while enjoying my coffee, some Greek yogurt mixed with organic blackberries, and a bowl of almond-butter granola, I considered staging a refight of this battle. To be certain, I would have plenty of reference material and expert advice upon which to draw. [2] However, rather than attempt to add something of subjective quality to the existing body of work on wargaming Carrhae in miniature, I decided, instead, to stage a “triple play” involving Parthians. Once again, I would employ the GRAND TRIUMPH! rules. (It appears that 2022 - for me, at least - will go down as the year of GRAND TRIUMPH!) Inspired by the accidental re-reading about the lopsided loss at Carrhae, the first “out” (if I may extend the unintended but useful baseball analogy [triple plays are very rare, but they do happen / please see https://www.baseball-reference.com/bullpen/Triple_play]) of this effort would see Parthians meeting Marian Romans on a stretch of arid as well as fairly flat ground. The second “out” would see the Parthians shifting their attention eastward, as they took on a Classical Indian army. (Horse archers, cataphracts, four-horse chariots and pachyderms . . . What’s not to like?) For the third and final “out,” the spur-of-the-moment plan called for a largish civil war battle, wherein opposing factions of Parthians would fight to see which side emerged victorious and thereby, which side would possibly establish a dynasty or at least hold power until they were overthrown from within or invaded and conquered from without.
Scenario 1
Again, I confess to being rather tempted to try and stage something similar to the historical battle of Carrhae on my extended tabletop. I debated the pros and cons of having the Romans marching the length of the table in three columns or perhaps drawn up in some kind of square while dicing to see where and when the various Parthian commands arrived. After a few days of this internal discussion and a few more spent sketching out other ideas, I decided to stage a simple and straight-forward battle.
Orders of Battle—
As for the composition of the opposing armies, well, the Parthians would field three commands.
The “orange division” would have 8 units of Horse Bow and 4 units of Cataphracts. The “plain division” would be divided evenly between Horse Bow and Cataphracts. There would be 6 units of each type. The “purple division” would bring 10 units of Horse Bow and 2 units of Cataphracts to this engagement.
The Marian Roman army would be divided into three commands as well. The “gray division” consisted of the following: 2 units of Elite Foot, 8 units of Heavy Foot, 1 unit of Light Foot, 3 units of Skirmishers, and 1 unit of Artillery. The “colorless division” contained 8 units of Elite Foot, 2 units each of Skirmishers and Light Foot, and 1 unit of Javelin Cavalry. The “light green division” was the cavalry wing of this expeditionary force. It consisted of 5 units of Elite Foot, 3 units of Bad Horse, and 4 units of Javelin Cavalry.
Terrain—
Rather than follow the established procedures for determining the look of the landscape for my fictional battle, I turned things over to my imagination and whatever kernels of knowledge or reference it could secure from the part of my brain that stored previous readings and thoughts on the subject of wargame landscapes. In its final form, my tabletop was decorated with 17 or 18 pieces of terrain. Not every piece was designated as a feature, with impacts or penalties on movement, melee and missile exchange, or line-of-sight. The vast majority of these pieces were arranged to break up the flat expanse of a new “desert” cloth purchased from a local crafts store. In addition to the various gentle hills, patches of scrub or rocky ground, there was a small oasis as well as a gully. These two features were classified as “difficult” terrain. [3]
Summary—
The Romans deployed in what might be described as their traditional battle formation. They placed their cavalry on the right, their regular legionaries on the left, supported by some mobile artillery, and arranged their best legionaries in the center of the line. The Parthian deployment matched the frontage of the Roman, essentially, but their commands and cavalry formations were spread out a bit more. The left wing saw 8 units of horse archers screen 4 units of cataphracts. In the center, 6 units of horse archers “book ended” 6 units of cataphracts. Over on the right wing, a small group of cataphracts served as a “base” for two columns of horse archers, each column having 5 units of light cavalry.

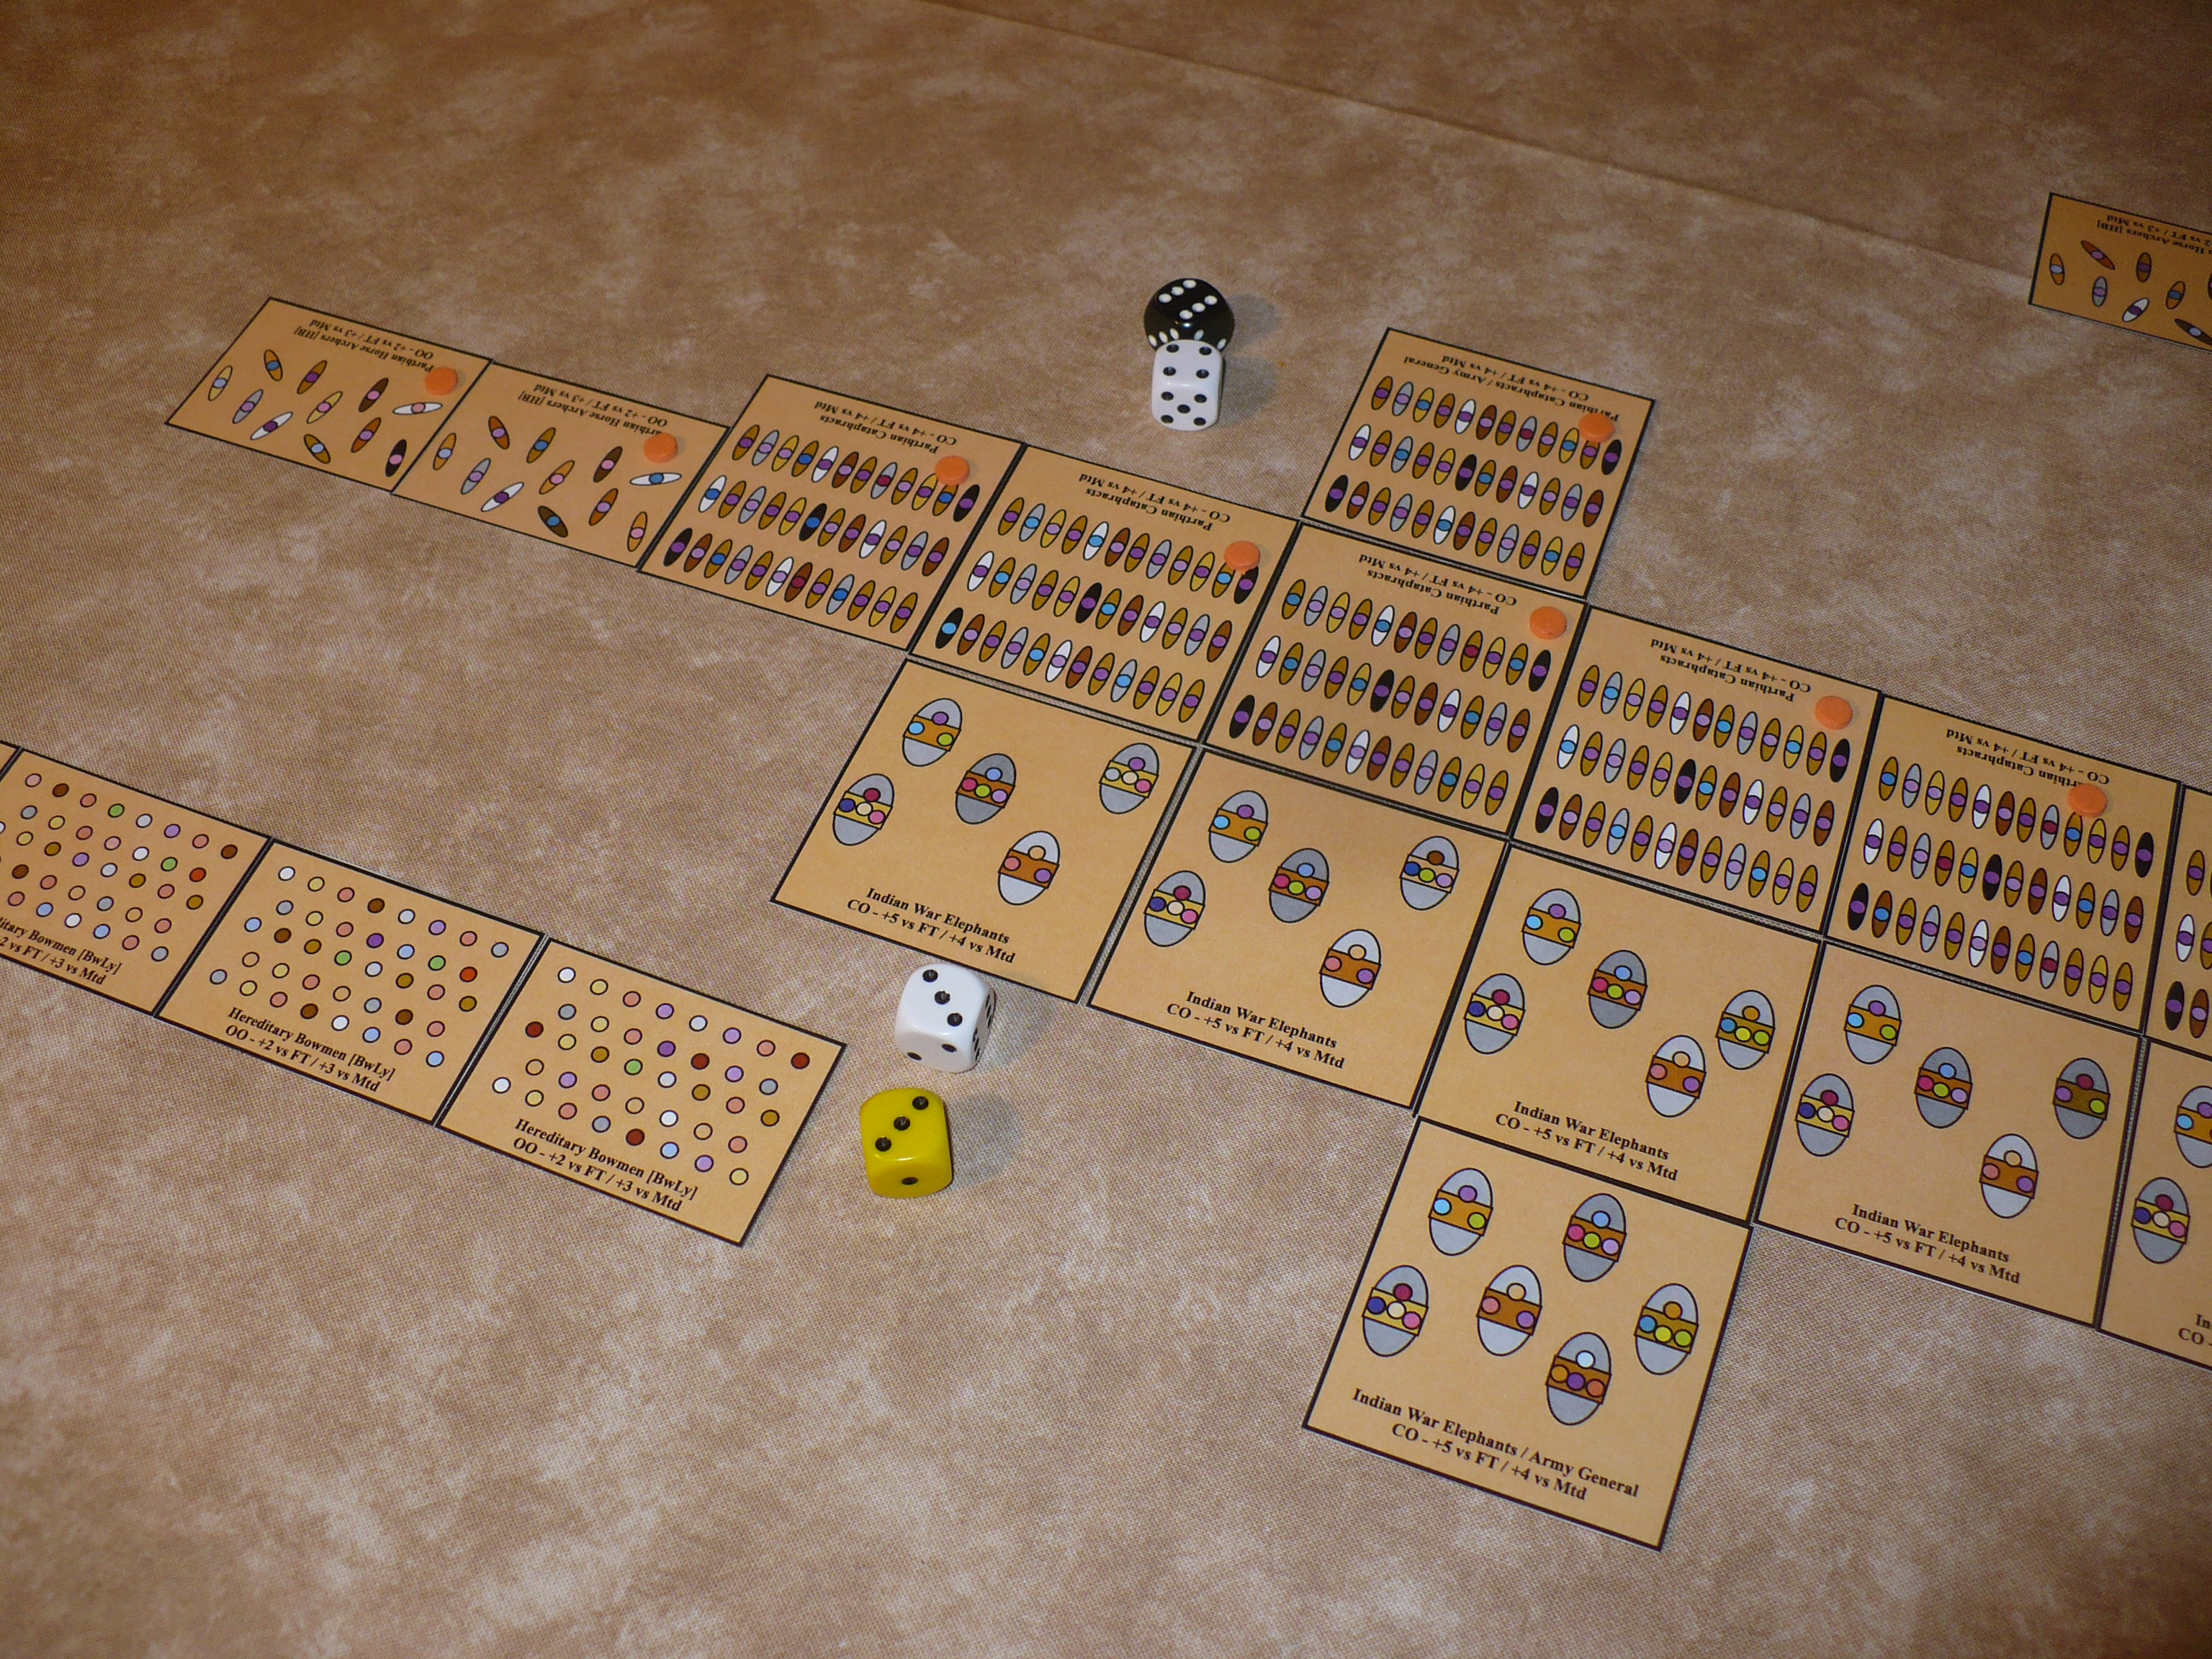
Picture 1 / The right wing of the Parthian army. The cataphracts (2 units) are formed in a line, while the more numerous horse archers (Horse Bow / light cavalry) are drawn up in 2 columns, each having 5 units. (The purple circles are “division” or “command” markers so that demoralization and formation integrity can be tracked at a glance.)

Picture 2 / The Parthian central command. The impressive line of 6 units of cataphracts is flanked by units of Horse Bow.

Picture 3 / Opposing lines of cavalry approach each other on the Parthian left / Roman right flank. Here, 7 units of Gallic cavalry and Allied horsemen face off against 8 units of Parthian horse archers who are supported by 4 units of cataphracts.

Picture 4 / A close-up of the Parthian cataphracts on their left wing. Again, the orange markers are for command identification.

Picture 5 / The first cavalry clash of the battle, showing the initial melee with the advantage going to the Romans (i.e., Gallic cavalry).

Picture 6 / The legionaries of the Roman main command are subjected to the attention of Parthian horse archers. (Correction: The Parthian melee modifier should be 1 instead of 2.) The “rain” of arrows will force the unit of legionaries to fall back.

Picture 7 / The cavalry clash on the Roman right / Parthian left has become rather a mess. Here, the cataphracts finally get into the action, falling on the exposed flank of a Roman unit with terrible results for the Romans. (There is no white die for the flanked cavalry as their initial value of 2 is reduced to 0 because they have been taken in the flanked and are overlapped by another enemy unit.)

Picture 8 / With no arrow barrage to soften up the Roman line, the cataphracts of the Parthian center trot into contact with the legionaries and other formations. The lines looked nice and neat for the moment, but that will soon change.

Picture 9 / Showing the contest in the center after 2 or 3 rounds of fighting. At the top left, a unit of cataphracts has broken through. In the center, 2 units of Roman infantry have been forced to fall back. The dice show the unfortunate result of the combat on the right of the Roman line. The victorious cataphracts will pursue into a unit of Allied horsemen, where the Roman army general rides and supervises the general action.
The Parthians moved rather rapidly across the arid and relatively flat field, while the Romans opted to wait and see how things developed. The first clash of the day occurred on the Roman right / Parthian left. After several turns of chaotic fighting, the Romans were demoralized and those units that remained were running, as fast as they could, towards the relative safety of their baseline. Quite the opposite took place over on the Parthian right. Here, the sub-general tried to move his light cavalry in a “right hook” maneuver so as to flank and even get behind the Roman line. The Roman leader in this sector bided his time and kept his legionaries “close to his chest” as it were. Parts of the Roman line wheeled as well as advanced in order to frustrate the Parthian plan. In the center of the field, the Parthian army general unleashed his cataphracts against the waiting Roman line without any preliminary arrow barrage. “Charging” at the trot, the fully armored cataphracts crashed with a cacophonous crunch into the long legionary line. After several minutes of desperate hand-to-hand fighting, the Parthian horsemen were able to punch a few holes in the Roman line. At the end of Game Turn 7, the center Roman command had lost 3 units of Elite Foot as well as a unit of Skirmishers. As a result, this formation was very close to becoming demoralized. As his right wing was no more and his center was in dire straits, the Roman general decided to order a retreat, save what formations and units could be saved, and let the Parthians have the field.
Comments—
Horse Bow units are a +3 versus mounted opponents while Javelin Cavalry and Bad Horse are +2. So, in the clashes on the Parthian left wing, their cavalry had a bit of an advantage. Against the enemy foot formations however, the Parthian light cavalry were at a disadvantage. With regard to the cataphracts versus enemy horse and enemy foot, it was a +2 modifier and then either even or fighting with a minus 1 modifier. I did not have these notes in mind when I ordered the Parthian formations forward. I would have liked to get around the Roman left flank, but relatively poor command die rolls and column movement threw a wrench in that plan. The clash on the Parthian left was a roll of the dice, literally. I was both surprised and relieved that the opposing Roman command was demoralized and then destroyed. As for the action in the center, there were no preparatory volleys of arrows. (I will need a few more games with Parthians and these rules to get used to this lack of shooting.) I suppose the frontal assault by the cataphracts was a little foolish, but as reported above, these extra-heavy cavalry were able to run over a few units of legionaries.
Looking at things from the other side of the field/table, hindsight informs that I should have screened my weaker cavalry with legionaries. I wonder if “digging in,” like Sulla did in that one battle I think, would have helped my heavy infantry against the cataphracts? Then again, in the role of the Parthian commander, I doubt that I would have ordered my cataphracts to charge this barrier. In the heat of the battle, I basically forgot about my ballistae and or scorpions. They fired one time at a cataphract unit but the modified scores were tied, so no damage/result was inflicted. I wonder here, as well, if a scenario rule or Battle Card allowing units of legionaries to have embedded light artillery might have helped? Even though the written requirements for a Roman defeat had not been officially met, I felt comfortable calling the scenario at the end of Turn 7. The Roman right wing was no more, and the center was on the brink of becoming demoralized. In my opinion, the sensible thing to do was quit the field and live to fight another day.
Scenario 2
Evidently, the Parthians seem capable of standing up to and handling a Roman army in a pitched battle. Admittedly, this was just one battle or wargame, and to be certain, a degree of luck has to factored in, but the Romans might not be able to avenge this recent defeat until they find a better general. I wondered how the Parthians might fare against a host containing of chariots, elephants, and massed archers.
Orders of Battle—
In very brief overview, the Parthian army for this second fictional engagement consisted of 9 units of cataphracts and 27 units of horse bow. These 36 units added up to exactly 144 points. The Indian army was valued at 143 points, even though they had more variety of troop types and a greater number of units. The Indian general would deploy the following for the coming battle: 9 units of elephants, 5 units of chariots, 4 units of bad horse, 7 units of heavy foot, and 27 units of bow levy. The Indians would enjoy a 16 unit advantage. This numerical superiority was tempered by the fact that half of the units in the Indian army were bow levy.
Terrain—
For this second solo wargame, I did not roll dice and consult tables in order to determine the look of my tabletop. For this second fictional battle, I let my imagination take charge again. This time, there were only a dozen terrain “features” scattered around my model battlefield. Most of these were pushed towards the four edges of the table; none of these “features” were specifically labeled or categorized as steep hill, marsh, gully, etc. As before, the purpose of the functional and inexpensive pieces was to break up the flatness and uniform color of this fictional ancient battlefield.
Summary—
For this engagement, the Indian army deployed along the far edge of the tabletop. If I were accused of thinking about Hydaspes (326 BC) as I set up these troops, I would not deny it. The “purple command” was assigned to the left wing. From left to right, this formation contained: 4 x bad horse; 6 x bow levy; 1 x heavy foot; 2 x bow levy; 1 x heavy foot, and 5 more units of bow levy. The sub-general in charge rode an elephant behind a unit of bow levy in the center of the formation. [4] The “light green division” was responsible for the Indian right. Here is their arrangement, starting on the far right and working left toward the center: 5 x chariots; 3 bow levy; 4 x heavy foot, and 4 bow levy. The elephant-riding sub-general on this wing positioned himself behind the heavy foot in the approximate center of the command. From left to right, the Indian center consisted of: 1 x heavy foot; 3 x bow levy; 6 x elephants; 4 x bow levy, and 1 heavy foot. The army commander led from behind the “regiment” of elephants. Of course, he rode on a pachyderm as well. It was the most splendidly decorated animal in the entire army. The deployed Indian army stretched for 98 inches out of an available 126 inches.

Picture 1 / The Parthian center deployed for battle. This was the command containing the vast majority of the cataphract cavalry of the army.

Picture 2 / Take from high above the left wing of the Parthian army. The advance command of horse archers can be clearly seen. These light cavalry are commanded by a cataphract sub-general. The “reserve” formation of the center can also be seen.

Picture 3 / The center of the Indian army, heavy on the elephants. (Pun on purpose and completely appropriate.)

Picture 4 / A portion of the Indian right wing, showing the sub-general’s elephant stand as well as some Heavy Foot and Bow Levy troops.

Picture 5 / Early in the battle, the Parthians move forward across the arid terrain.

Picture 6 / The Indian chariots way over on the right wing. These “unarmored fighting vehicles” (UAFVs) decided not to keep pace with the slow moving Bow Levy units, but raced ahead in order to position themselves for a flanking move or moves.

Picture 7 / At the top of the frame, the Indian left and Parthian right have “met.” The Parthian horse archers are not making actual contact, but are riding up fairly close to the enemy formations and loosing arrows before wheeling right or left and then circling back around. The opposing centers are drawing ever closer: the clash between pachyderms and cataphracts is imminent!

Picture 8 / A close-up of the contact and combats on the Indian left against swarms of Parthian horse archers.

Picture 9 / The first melee on the Parthian right wing sees a unit of Horse Bow doubled by the Indian Bow Levy. A check of the QRS informed that these light cavalry were destroyed instead of being able to evade.
The Parthian army, in contrast, occupied just 65 inches of the tabletop. Further, it was separated into three distinct commands and arranged into something resembling the formation used by the Zulus. (Here, I am thinking about that one scene from the movie starring a young Michael Caine about the famous action at Rorke’s Drift. An experienced soldier/cavalry officer draws a diagram in the dirt with his sword and explains to the inexperienced British officers how Zulus engage their enemies. Please see https://en.wikipedia.org/wiki/Zulu_(1964_film).) The Parthians were an all-mounted force, however, and they only had the “head” and “horns,” there was no reserve that could be committed once the enemy had been engaged. The right and the left commands each had 11 units of horse bow and 1 unit of cataphracts. The center included 5 units of horse bow and 7 units of cataphracts.
Not being hampered by the integration of relatively slow-moving pachyderms and even more sluggish groups of levy foot armed with bows, the Parthian commands were able to make good progress across the arid and flat ground separating the armies. At first, the subordinate commanders on the wings thought they would ignore the potential overlaps of the longer Indian line. However, when the chariots on the Indian right and cavalry on the Indian left moved away from the main line and started to wheel in towards the Parthian commands, there was a fairly rapid change of thinking. The “horns” of the Parthian advance peeled off a few units of light cavalry to counter the Indian threats. On the Parthian right wing, no actual fighting developed between the opposing bodies of cavalry. The Parthian horse archers did approach the long line of bow levy and after some initial resistance, began to tear holes in it. On the opposite flank, a “back and forth dance” took place between a few units of Indian chariots and a similar number of Parthian horse archers. Through hard fighting, accurate arrow volleys and a bit of luck, the Parthians were able to break a unit of chariots. A couple of Indian foot units were also lost in this sector.
The decisive action took place in the center of the field, when the cataphracts collided with the line of Indian elephants. This was also a “back and forth” contest, but one that turned quickly in the Parthians’ favor. On the flanks of this meeting of two seemingly irresistible formations, several units of bow levy foot were swarmed and routed by circulating formations of horse archers. The cataphracts maintained their formations despite the smell and trumpeting of the colorful beasts and were soon tearing elephant-size holes in this Indian command. It certainly was not long before the Indian center was demoralized and the surviving pachyderms were packing their trunks in a hurry. The battle was called at the end of Game Turn 7 as the rout of the Indian center had left a gap 3.5 feet wide in their original line of battle. Had the scenario continued, the smart money was on the Indian left becoming demoralized in the next turn or two and then running away. Parthian losses amounted to just 2 units from each command.

Picture 10 / The condition of the Parthian right wing and Indian left after the rest of the melees in this sector have been resolved for the present turn. As shown in the photo, the Parthian units are a bit disorganized while the Indian line of battle remains intact.

Picture 11 / Crunch time in the center as troops of Indian elephants vie against deep formations of heavily armored cataphract cavalry. The result of the indicated melee sees the cataphracts shattered and the elephants pursuing into the vacated space.
Picture 12 / The meeting of elephants and cataphracts in the center of the field, with the melee going to the Parthians. The animals and their crews will not forget this result.

Picture 13 / Several formations of Parthian light cavalry ride up very close to the Indian foot formations and let fly with a barrage of arrows. The dice show the result of one “melee” where the odds favored the Indians, but the gods did not.

Picture 14 / Another shot of the action in the center of the field, with the general of the Indian army urging his men and pachyderms on to success against the densely packed ranks of enemy cavalry.

Picture 15 / Another turn and another attack on the Indian elephants. This time, the Parthians have brought a lot of friends. The white dice show the modified melee factor; the colored dice show the melee roll. A roll of 9 will beat a 4 every time. Since they have been doubled, the elephants are destroyed. The winning unit will pursue.

Picture 16 / A bit of action way over on the Indian right flank, as the chariots try to turn the Parthian left but are held off by some capable and stubborn light cavalry.

Picture 17 / Late in the contest, a unit of Parthian horse archers was able to swing around and take an enemy unit from behind. I briefly wondered if the Indian formation would be able to use the friendly unit to its right as support, but then figured no due to their orientation. I wondered for a longer period of time why the modifier for flank and rear attacks was the same. It seems to me that being attacked from behind is at least twice as dangerous (physically as well as to morale) than being attacked on a flank.

Picture 18 / Another photo of the swirling chariot vs light cavalry contest over on the Indian right flank. The Parthians were able to shoot down both crew and horses, breaking the middle chariot unit. The yellow die was fairly representative of the kind of luck the Indian army had throughout the day.
Comments—
As the next contest is a fictional civil war scenario, the Parthians are guaranteed of running these particular tables and posting an undefeated record. Before I move on to the cataphracts vs cataphracts and horse archers vs horse archers engagement, I should like to type a few lines about how this recently concluded battle played.
To be sure, deploying and using the Parthian army that I have built does not provide me with a lot of options. Broadly summarized, I have to fix the attention of the enemy with swarms of horse archers and then “steam roller” a section of his line with the cataphracts and hope that the dice are with me. Too late I see that I should have deployed the Indian bow levy in depth. This would have resulted in a shorter formation overall, but it would also have provided a temporary blocking force for those Parthian mounted units that usually bested (i.e., shattered) the low-quality Indian foot in melee. Having played wargames with around half-a-dozen sets of rules over the course of a few decades, I was a bit surprised to find that elephant vs cavalry melees did not disadvantage the horsemen in one way or another. It was a little odd to resolve most of the cataphract vs pachyderm melees with +4 for each stand. Part way through a turn, I worried that I had missed something or forgotten a certain modifier, but on checking over the QRS, I saw that skirmishers are the only troop type who can hope to deal with elephants. (This seemed historical; the interaction between elephants and cavalry, not so much.) It seems to be that cavalry vs elephants should see the cavalry be at least at minus 1 to their factor or to their die roll. This admittedly subjective observation aside, the just concluded contest was enjoyable. My level of comfort with these rules is increasing little by little. However, I am still nowhere near confident in my mastery of the finer points or in my ability to engineer a string of decisive victories.
Scenario 3
As described in the introduction, this final scenario or “out,” to reference the attempted baseball comparison, would feature two factions or alliances of tribes vying for supremacy. For sake of simplicity and to equate the civil war setting to the struggle over slavery in nineteenth century America, I designated one side “Blue” and the other side “Gray.”
Orders of Battle—
The Blue army or faction contained 12 units of cataphracts and 24 units of horse bow divided into 3 commands. The extra-heavy cavalry were assigned in groups of 3, 3, and 6. The screening light cavalry units were distributed across these formations so that each command was worth 48 points. In contrast, the Gray army included 8 cataphract units and 28 horse bow units. The extra-heavy cavalry was divided in this way: 1, 3, and 4, while the light cavalry filled out the commands so that this army, this faction, also brought 144 points to the fictional battlefield.
Terrain—
For the sake of consistency and simplicity, I followed the same routine for this wargame as I had for the previous two engagements. Once again, there were approximately 12 pieces of terrain on my desert-themed or desert-like tabletop. Once again, the vast majority of these were not actual terrain features but variously colored and shaped pieces of paper and other materials so that the competing Parthian factions would not be fighting over relatively flat and featureless terrain that looked a little bit like a blondie bar. (For those readers not familiar with this tasty treat, please see https://sugarspunrun.com/blondies-recipe/. The picture is certainly appetizing and made my stomach ache with longing.)

Picture 1 / Showing the initial deployments of each army as well as a pretty good view of the nature of the ground over which the issue would be decided. The “Blue Army” is on the left of the frame; the “Gray Army “ is at the top-right.

Picture 2 / Another overview of the initial deployments and another look at the terrain from a different angle. Here, one is looking at or over the “Gray Army’s” right wing. This command has 9 units of horse bow reinforced with 3 units of cataphracts.

Picture 3 / Early moves in the engagement, showing the advances of the “Gray Army” right (marked by the blue arrows, ironically), and the response of the “Blue Army” left wing (yellow arrow).

Picture 4 / In the center of the field, the “Blue Army” command will have to deal with the obstacle of the oasis. The light cavalry of the “Gray Army” will also have to take this terrain into consideration, but they will likely be more worried about facing the much heavier cataphracts.

Picture 5 / The general melee over on the “Blue Army” right wing. Here, the “Gray Army” formations suffered a series of set backs. The dice showing the result of the first in a few melees which saw many light cavalry troopers falling from their mounts.

Picture 6 / On rare occasion, when the dice gods decided to give the “Gray Army” units a little break, the melee would go their way. In this sector, unfortunately, it would prove too little and too late for the “Gray Army,” as this command would soon be marked as demoralized.

Picture 7 / The hill next to the oasis is also the site of some back-and-forth fighting between opposing lines of horse archers.

Picture 8 / In contrast to their rather poor performance on the one flank or wing, the light cavalry of the “Gray Army” is proving stubborn in its battle against the left wing command of the “Blue Army.”

Picture 9 / As the “Blue Army” cataphracts lumber past the oasis, they are attacked by several units of horse archers from the central command of the “Gray Army.” As one might expect, the combats all go in favor of the armored riders and horses: 2 units of light cavalry are driven off in panic, while the other 2 fall back instead of succumbing to fear.

Picture 10 / A frustrating development for the Parthians fighting for the “Blue Army.” Here, on their left flank, an enemy unit of light cavalry, even though fighting to its front as well as its flank, is able to turn back the attacking unit.

Picture 11 / The center of the field after a few units of horse archers had sacrificed themselves to slow down the approaching wave of enemy cataphracts. Somewhat surprisingly, a couple of units of cataphracts were able to get on the flanks of the occupied enemy units, thus sealing their doom when the melees were lost.

Picture 12 / A formation of supporting cataphracts decides to add its weight to the contest between light cavalry units. The formation marked with the teal or sea green dots is attacked on the flank by a mass of cataphracts. The dice show the unfortunate but not surprising result: The light cavalry who survived the charge into their exposed right flank are scattered.

Picture 13 / The large black die showing a 6 is a marker for a command that is demoralized as a result of losing too many units/points. If a unit in a demoralized command is engaged in combat, it fights with a negative modifier. Even though demoralized and even thought facing heavily armoured cataphracts, this brave squadron of horse archers were able to resist the attention of the superior enemy cavalry.
Summary—
With everyone on horseback, battle was joined quicker than in the previous two engagements, and a decision was reached earlier as well. The fighting started on the Blue right and Gray left. These contests saw the Gray formations become demoralized by Turn 3 and routing off the table by Turn 4. The struggles in the center of the field and on the Blue left and Gray right were slower to develop. Mistakes were made by both sides as the battle progressed. For example, in the center of the field, horse archers were ordered into contact with an enemy formation made up entirely of cataphracts. Sufficed to say, this local battle did not end at all well for the light cavalry. In fact, this tactical error resulted in the center command of the “Gray Army” becoming demoralized. Having no friendly forces on their left and a center that was crumbling if not running away, the rebel prince of the one Parthian faction conceded. Coincidentally, just as their center started to fall apart, the command fighting on the Gray right was able to push the Blue command in this sector past its morale breaking point. To be certain, it was a defeat for the Gray faction, but at least it was not a complete rout.
Comments—
I thought the interaction between opposing units of horse archers was fairly accurate or realistic, though I still found it odd to not roll dice for arrow volleys. Given the scale or abstract representation of combat in these rules, I will just have to get used to the way that things are done. That said, I saw in one video of a Zoom game that a “shower shooting” Battle Card was being used by an army fighting against Crusaders. I wonder if it might be worth my while to tinker with this Battle Card and adapt it for use with Parthians so that arrow volleys become an actual part of the engagement instead of simply factored in to the melee procedure? This question about shooting also came into play during the scenario when some light cavalry took on some cataphracts. Realistically, or according to my current view, the horse archers would have kept their distance and simply let fly with volleys of arrows. They would have scampered away when the cataphracts tried to catch them. At one point during the recently completed battle, some cataphracts were able to get onto the flanks of some light cavalry. While within the scope of the rules, this situation gave me pause, as I wondered how the heavy, slow, and staying-in-formation cavalry would be able to catch open order horsemen. This was the only battle wherein cataphracts could have met cataphracts. Unfortunately, these collisions never took place, as the encounter was decided without the “big boys” getting involved.
Evaluation
Three games required a total of 17 turns. Admittedly, each game was not played to an official resolution. When two of three commands are demoralized, that signals to me that the “writing is on the wall,” that the battle is over for all intents and purposes, and there is not really a need to play all the way to the rules-based victory requirement. Three games saw the Parthians emerge victorious, even though there was no way that they could lose the final battle. The relative ease with which they dispatched a Roman army and then an Indian army made me wonder about the effectiveness of Parthians under these rules. Could it be that I am that good a general? I rather doubt it. I think it was more a case of the dice being on my side. To be sure, dozens more games are necessary before any valid data points can be plotted and interpreted. By and large though, I think the three-act play starring Parthians went fairly well. I gained some additional experience; I got a chance to use an army that I don’t often use or even consider using on my tabletop, and I was engaged and entertained. In general, and at the acknowledged risk of making a poor play on words, this experiment was a win-win-win. In fact, it would be fair to remark that I find myself a bit preoccupied with Parthians. During this three-game set, I took some time to look at other sets of rules and their Parthian army lists to see how those rules and lists depicted the army that handed poor Crassus his son’s head as well as a significant defeat.
Notes
- Riding the Lightning: A Year in the Life of a New York City Paramedic, by Anthony Almojera, is a graphic, gripping, depressing, but also uplifting read. It is a memoir of the lieutenant’s experiences from October 2019 to September 2020. While I was aware of what was happening in New York City and the larger world during this time by watching television news and reading papers and magazine articles, this book adds a level of detail and depth that almost puts the reader in the passenger seat of the veteran paramedic’s ambulance and or command truck as his shift begins. The stories reminded me of days long gone by when I used to work (in a non-clinical role) in the Emergency Room of a Level I Trauma Center.
- Roughly ten minutes spent searching the Internet turned up the following links/sites: https://www.vislardica.com/vb-sc-carrhae; https://bucellarii.blogspot.com/2020/11/battle-of-carrhae-53-bc-command-and.html; https://fanaticus.boards.net/thread/2685/crassus-carrhae; https://shaun-wargaming-minis.blogspot.com/2022/03/battle-of-carrhae-53bc-using-ancient.html; https://gatesofnineveh.wordpress.com/2011/09/20/the-battle-of-carrhae/, and http://theminiaturespage.com/boards/msg.mv?id=344189. A few days later, I decided to do a little more digging, but in a different location. I happened upon this “nugget” from none other than Tony Bath. In the May 1966 issue of Slingshot, in an article titled “The Campaign and Battle of Carrhae - 53 BC,” the gentleman wrote the following under Section IV. The War Game: “The battle taken by itself is less likely to be worth reconstructing, since with the forces as constituted only one result is likely if your rules are realistic. But if you want to understand the power of the horse archer, by all means reconstruct the battle and try commanding the Romans. I guarantee a feeling of complete frustration in short order!”
- The procedures for determining the nature of the battleground when using TRIUMPH! or GRAND TRIUMPH! are abundantly clear. They offer a simple and straight-forward way of determining what the battlefield will look like for a friendly or more serious competition game. The staging of historical battles also seems very possible using the terrain rules as they are written. However, unless I simply overlooked it, I could not find a definition of “difficult” terrain in these rules. In fact, there are seven (7) different kinds of Topography. I counted a dozen named terrain features. These are: stream, steep hill, gentle hill, woods, wooded hill, coast, rough, ploughed fields, marsh, dunes, oasis, and village. Out of curiosity, I retrieved my well-worn 3rd Edition copy of L’Art de la Guerre and reviewed the terrain rules and types in this colorful set of rules. Instead of Topography, ADLG offers five (5) Regions. By my count, ADLG also lists a dozen terrain types. These are: gentle or steep hills, brush, plantations, fields, woods, marsh, sand dunes, gully, road, village, and river or coastal zones. There are four general types of terrain that can be found on the ADLG tabletop. These are: Open, Rough, Difficult, and Impassable. At the other end of the “terrain spectrum,” it is interesting to look over the terrain rules found in the Armati 2nd Edition rules. There are no Topographies or Regions, per se, but Core and Bonus Terrain options are provided in the army lists. As for types of terrain, the Armati rules list or provide for just half-a-dozen. These terrain types are: open ground, gentle rise, steep hill, woods, rough ground, and streams. Curiously, rough ground is defined as the “equivalent of rocky patches of high ground.” Does this mean that patches of rough ground can only be placed on steep hills?
- The footprint of this command was rather long. Checking the command radius, it was noted that a few of the cavalry units were out of the “universal leadership radius.” I checked the rules, and in 31.1 found: “The general’s command distance is 16 MU if the general’s stand has a clear line-of-sight to the moving stand, group of stands, or column of stands.” Interpreting “group of stands” somewhat loosely, I decided that there would be no command penalty for the long Indian formation. Perhaps I was in error, but as a solo gamer, I do not have to worry about rule disagreements or misunderstandings with the opposing player-general. Anyhow, I find that I learn better with diagrams and so forth, especially when the material is wargame rules. It would be helpful/nice to have some additional diagrams showing exactly how this command distance and line-of-sight rule works.