A BIT LIKE BRUNANBURGH
I cannot say for certain how many times I have read “The Battle of Brunanburgh - 937 AD” report found on pages 154-161 of the Hail Caesar rulebook, but I think the number falls somewhere between 12 and 20. Similarly, I cannot estimate the amount of time I have spent admiring the included photographs and studying the provided orders of battle along with the map of the marvelous-looking tabletop. What I do know is that this colorful description of grown men playing at war in the Dark Ages and hurling period-specific insults at each other (in good-natured jest, of course) served as inspiration for my amateur attempt to stage a version of this bloody contest using the L’Art de la Guerre or ADLG rules. Looking back through my records, I see that this was ‘Battle Report’ Number 31 posted in late September 2016 to the “Games Last Played” discussion thread of The Society of Ancients Forum. In “When Kings Collide,” there were approximately 1,000 points of “miniature” Vikings and around 850 points of “miniature” Anglo-Saxons on my tabletop. (This was substantially larger than a typical ADLG game wherein armies worth 200 points would be deployed.) The length of the finished narrative was roughly 4,800 words. The great and much missed Patrick Waterson [1] was kind enough to offer a comment (the only comment as it turned out) on my effort.
Approximately six years later, I found myself suddenly interested in revisiting “one of the largest battles of the Viking Age,” as Rick Priestley notes on page 154 of his popular rules. My intention was not to reconstruct a more accurate or more historical version of the actual engagement, nor was it to make amends for my ADLG treatment of the action. I was simply interested in staging something like Brunanburgh. I guess it could be said that I had developed an “appetite” for a scenario in which shieldwalls would figure prominently. Once again, in order to continue to increase my comfort level, experience and knowledge of its finer points, I decided that I would employ the GRAND TRIUMPH! rules. In addition to rereading the colorful account provided in Hail Caesar, I looked at “The Battle of Brunanburh Re-Fought,” written by one H. Charlesworth of the Rotherham & District Wargames Association and published in Issue 103 of Slingshot, The Journal of The Society of Ancients. I also took another look at the original poem. (Please see https://thewildpeak.wordpress.com/2014/05/03/why-cant-we-still-speak-like-that-the-old-english-poem-the-battle-of-brunanburh/.)
Orders of Battle
On the one side of my 6.5 feet x 3.75 feet tabletop, I had 96 points of Saxons (Middle Anglo-Saxon [617 AD to 1016 AD]) and 48 points of Vikings (Viking [850 AD to 1260 AD]). These forces as well as those of their opponents were found (for free, it should be noted if not emphasized) at: https://meshwesh.wgcwar.com/home. For lack of something more original or clever, the Saxon-Viking army was designated the Blue Army. On the other side of my “model” battlefield, there were 48 points of Welsh (Dark Ages Welsh [580 AD to 1149 AD]), 48 points of Scots (Pre-Feudal Scots [842 AD to 1124 AD]), and 48 points of Vikings. For the sake of consistency as well as simplicity, this three-sided alliance was labeled the Gray Army.
As for command and “control,” there were three generals in each army. The overall leader of the Blue Army was an English king. He was assisted by a cousin (a prince) and a fierce Viking chieftain. The Gray Army had an even more fierce as well as scarred, tattooed, bearded and barrel-chested Viking. This Viking was a very capable and much feared veteran of a dozen campaigns. He was given a +2 command modifier. His co-commanders were a Scottish king (the overall leader of the “Alliance”), and a Welsh prince. Due to a lack of imagination, none of these leaders were given a period-appropriate name.
Terrain
Initially, I thought I would try to construct a hybrid model of the landscape pictured in the Hail Caesar narrative and the diagrams provided with the Charlesworth report. [2] After a couple of days wherein I sketched, tinkered and toyed, I decided to go in a completely different direction.
On page 42 of Wargame Tactics [3], there is a neat, simple black and white map of the first turns of “The Battle of Korepsis Pass,” a fictional ancient contest between Athenians and Aetolians. I thought I could borrow this terrain and then modify it slightly for the proposed Dark Ages struggle. I figured that a village or at least farmstead of some sort, a few fields, a track and perhaps even a pond or small lake would add some color to my “model” battlefield. Again, I gave myself a couple of days to mull this option over, to sketch some rough maps and tinker. It will probably come as no surprise to the handful of readers of this post that I decided scrap this plan as well and develop third one. (The idea placing a large forest on the table was at once intriguing but also problematic.)
Looking back through the Terrain rules in my PDF version of TRIUMPH!, I knew that I did not want to follow the standard procedures for selection, numbers, and placement of features or types. I did know, however, that I liked the variety of choices offered under the ‘Arable’ topography. Two more days, perhaps three, were spent sketching and tinkering (in my spare time) until I was satisfied with the fictional landscape.
Standing next to one long-edge of my tabletop, I imagined the wooden surface as a compass. I was at the S of the directional device. To my right was E, and to my left was W. The other long-edge would represent the N of this imaginary compass. With that orientation, I hope the following description makes at least a little sense.
The Village of Clarendon was located on a steep hill in the northeast corner of the tabletop. It was a fair-sized village, surrounded by a number of fields and not too far from a patch of light woods (directly south of the dwellings), through which a shallow freshwater stream meandered. The stream was no real impediment to man or beast; in its deepest parts, it only came up to a short man’s thighs. The vast majority of the watercourse would only soak feet and dampen shins. Very close to the N on my “compass,” there was another steep hill. This terrain feature had a patch of scrub in front of it. Traveling west a bit, there was a rather small and gentle hill in the north-west corner of the fictional battlefield. This slight elevation was partially covered by a patch of heavy woods. Moving directly south from this stand of trees, there was a large area of scrub and then in the south-west corner, there was steep hill which had a patch of rough ground on a portion of it. Moving in an easterly direction across the southern long-edge of the tabletop, one crosses the stream and comes to another large patch of scrub. Immediately to the right of this is a thin gentle hill with a small patch of rough ground on its northern side. Close to the center of the fictional field is a large gentle hill which angles toward the northwest. In the approximate middle of this hill, there is a patch of scrub.
If this section was too confusing or wordy, here’s hoping that the three or four pictures of the terrain set up will help sort things out.

Showing most but not all of the terrain of the fictional field on which Saxons, Vikings, and others will do battle. This is taken from the west looking east. At the top left of the picture, the fields before the Village of Clarendon may be seen. There are other features of course: gentle and steep hills, areas of scrub, and the stream that does not penalize movement nor melee due to its shallow nature and negotiable banks.

Looking directly at the northeast corner of the field, at the Village of Clarendon and its surrounding terrain. There are five (5) agricultural plots or fields; there is a light woods, and a stream meandering in the foreground.

This photo shows the corner of the field opposite from the Village of Clarendon. Here, there is a hill covered by a patch of rough ground. There is some scrub and another hill on the upper right.
Deployments
Looking over the northern side of the battlefield first, the Saxons took up their posts on the left and center; the Vikings held the right. The deployment of the secondary Saxon command was as follows:
Sk Rb HF HF HF EF* HF HF HF HF HF HF
Hd Hd Hd Hd
Where Sk represent Skirmishers - in this case bowmen, and Rb represents Rabble or “Scouts” armed with javelins. The HF stands for Heavy Foot or Select Fyrd. The EF* represents a unit of Elite Foot, or in this particular case, Thegns. The commander of this formation was embedded with these veteran fighters. The Hd indicates stands of Great Fyrd troops or Horde. As one might imagine, these men are not the most capable or confident of soldiers.

This shows the arrangement of units on the Saxon-Viking (i.e., Blue Army) left. The Select and Great Fyrd are positioned on the level ground before the Village of Clarendon.
The Saxon center was arranged in this way:
HF HF HF HF HF EF EF$ EF HF HF HF HF HF HF
This command included Select Fyrd and a few units of Thegns. The overall commander of the Saxon-Viking army was in the center of his Thegns (the unit marked with the $ symbol), weapon drawn and shield held fast, ready for battle.
The right wing of the army contained the Vikings. These grim warriors were deployed as follows:
Ar Bk
HF HF HF HF EF EF* EF HF HF HF Rd Rd
Where HF represents Hird; EF represents Huscarls; Ar stands for Archers; Bk stands for Berserkers, and Rd represents Raiders or Marauders. As with the Saxons on the left wing, the Viking chieftain was with his central unit of Huscarls.

Here is the Viking contingent on the right of the Saxons-Vikings deployment. These seasoned warriors would face off against the Scots over fairly open terrain.
Shifting the focus to the “Triple Alliance” arranged along the southern half of the tabletop, the Scots held the left flank, the Vikings were in the center, and the Welsh were assigned to the right flank. The army or alliance commander was the Scottish king. His formation was drawn up in a single line running at a slight south-west to north-east angle. From left to right, his command consisted of the following:
BH LS LS LS LS LS Wb Wr$ Wb Wb Wb Wb LS LS LS JC

And here are the Scots, all nice and neat in a line. The Scots had some horsemen, but these mounted troops would make no great difference in the coming battle.
Where BH represents Bad Horse or Scots on horseback, and LS represents Light Spear. Wb represents Warband, in this specific case, Galwegians. The Wr stands for Warriors or Scottish Thegns. (Again, the $ indicates the unit to which the army general is attached.) The JC represents a better kind of mounted Scots: Javelin Cavalry.
The Vikings in the center were arranged in this manner:
Sk Bk
Rd HF HF HF HF EF EF* EF HF HF HF HF
The Viking commander was an especially fierce and experienced campaigner, to say nothing of a towering specimen. His melee modifier was +2 instead of +1.
The Welsh contingent on the right wing was a little cramped for space due to the nature of the ground. Their formation was deployed as follows:
LF LF
Wb Wb Wb Wb Wb Wb Rb Rb
Wb JC* Wb JC Wb Wb

Where LF represents Light Foot (basically javelinmen), and Rb indicates Rabble (more Welsh carrying javelins). Wb, as above, stands for Warband, and JC represents mounted Welsh or Javelin Cavalry. The commander of the Welsh is with one of these units.
In contrast to the simple counters used in the time-traveling Pharsalus scenario, the counters employed for this solo contest were crafted with a little more care. To be certain, these colored card representations do not hold a candle to the more traditional historical miniature games. [4] However, as I have often remarked or stated (sometimes to the annoyance of those readers who persevere through these infrequent and various posts), that is not the intention. If pressured to provide and explanation or make a statement, I guess I would adopt this “philosophy” toward historical miniature wargaming: “The play’s the thing . . .” — if I may be permitted to borrow a line from one of Shakespeare’s most recognized plays.
How It Played
The Gray Army or “Triple Alliance” — as Scots, Vikings and Welsh were working together — started the battle rather poorly with each contingent rolling a 1 on their command die. Moves forward were made, but there was a slight sense of embarrassment. This emotion increased when the Saxons and Vikings rolled much better and were able to conduct a couple of march or double moves. The first few turns went back and forth like this. Fortunately, the Gray Army did better on subsequent command rolls and was able to get its various troop types moving or catching up with the enemy. The Scots completed a couple of wheels to bring their formation more into line with the approaching Vikings.
This photo was taken from the Scottish left flank, showing their advance as well as the Vikings forward movement in the center. (Another name for the Gray Army was the “Triple Alliance.”) As indicated previously, the Scots would face a group of Vikings, while another group of friendly Vikings would fight the main Saxon command.
First contact occurred in Turn Four and took place on the long central hill when some Scots charged into Vikings and Saxons. These initial melees resulted in a series of ties. Evidently, neither side wanted to give the enemy the satisfaction of drawing first blood or pushing a friendly unit back. Over on the far left of the Scots’ position, a unit of Light Spear was routed by a unit of Viking Raiders, so first blood did go to the Blue Army. This local defeat was countered when a unit of Viking archers made the mistake of attacking instead of standing off and loosing volleys. They were quickly put to the sword by the targeted formation. Adding insult to injury, a unit of Berserkers charged but was repulsed and forced to fall back.

This picture was taken above the middle of the field and shows the slow advance of the opposing center formations toward each other. The general of the “Triple Alliance” is quite powerful (melee modifier of +2), and his Huscarls are screened by some Berserkers as well as some skirmishing bowmen.
In the next turn, the battle developed all across the field as the Welsh were finally able to get troops up and fighting. Their warbands did well initially, destroying one unit of Fyrd and forcing another to recoil. On the right of this sector, however, the Welsh light troops were stymied and forced to regroup for another effort. A battle of attrition developed in the center of the field, with a slight advantage going to the Saxons. Over on the left of the Gray Army, things were not going so good. While a unit of Scottish horse was able to fight off enemies to their front and flank, the Scottish foot could not roll a decent melee die. The Vikings hacked and slashed and stabbed, cutting their way through no fewer than five units of Galwegians and or Light Spear.
At the start of Turn 6 of the battle, a collective groan was produced on one side of the field when each command roll produced a 1. Despite this circumstance, the Gray Army was able to stave off defeat. The Scots held after some desperate fighting. In the center, the Viking contingent was able to mete out some punishment against the Saxons, essentially evening the casualties score. The Welsh also held on. In this sector, the fighting also took on the attributes of a struggle of attrition.

Near the Village of Clarendon, the Welsh, formed two-ranks deep, are advancing against the Saxons assigned to guard this sector. Note that the Welsh Rabble has not been able to keep up due to low command dice and having to move through woods.
The pressure on the Scots was too great and this contingent became demoralized in the next round of melees. The Vikings were simply too capable, fierce, or lucky. The commander of the “Triple Alliance” was attacked by three Vikings and cut down as his unit of Thegns was overwhelmed. In a last-ditch effort, a unit of Galwegians and a unit of Light Spear charged into the Viking line and fought stubbornly for several minutes. The enemy numbers were too many and eventually, the Galwegians were routed. Desperate fighting ranged across the other sectors of the field. Fate smiled on the Saxons in the center, and they were able to push the Vikings past their break point. In addition to the left flank being completely routed, the center formation of the Gray Army was now demoralized. The Welsh, after some initial success, were now also on the brink of having their morale crack. Recognizing that the battle was lost, the Viking commander let fly with a stream of curses and then issued orders for what was left of his army to withdraw. The Saxon contingents, being rather bloodied, elected not to launch any organized pursuit. The Vikings, occupied with plundering what they could find on the bodies and horses of the killed and wounded Scots, were too far away.

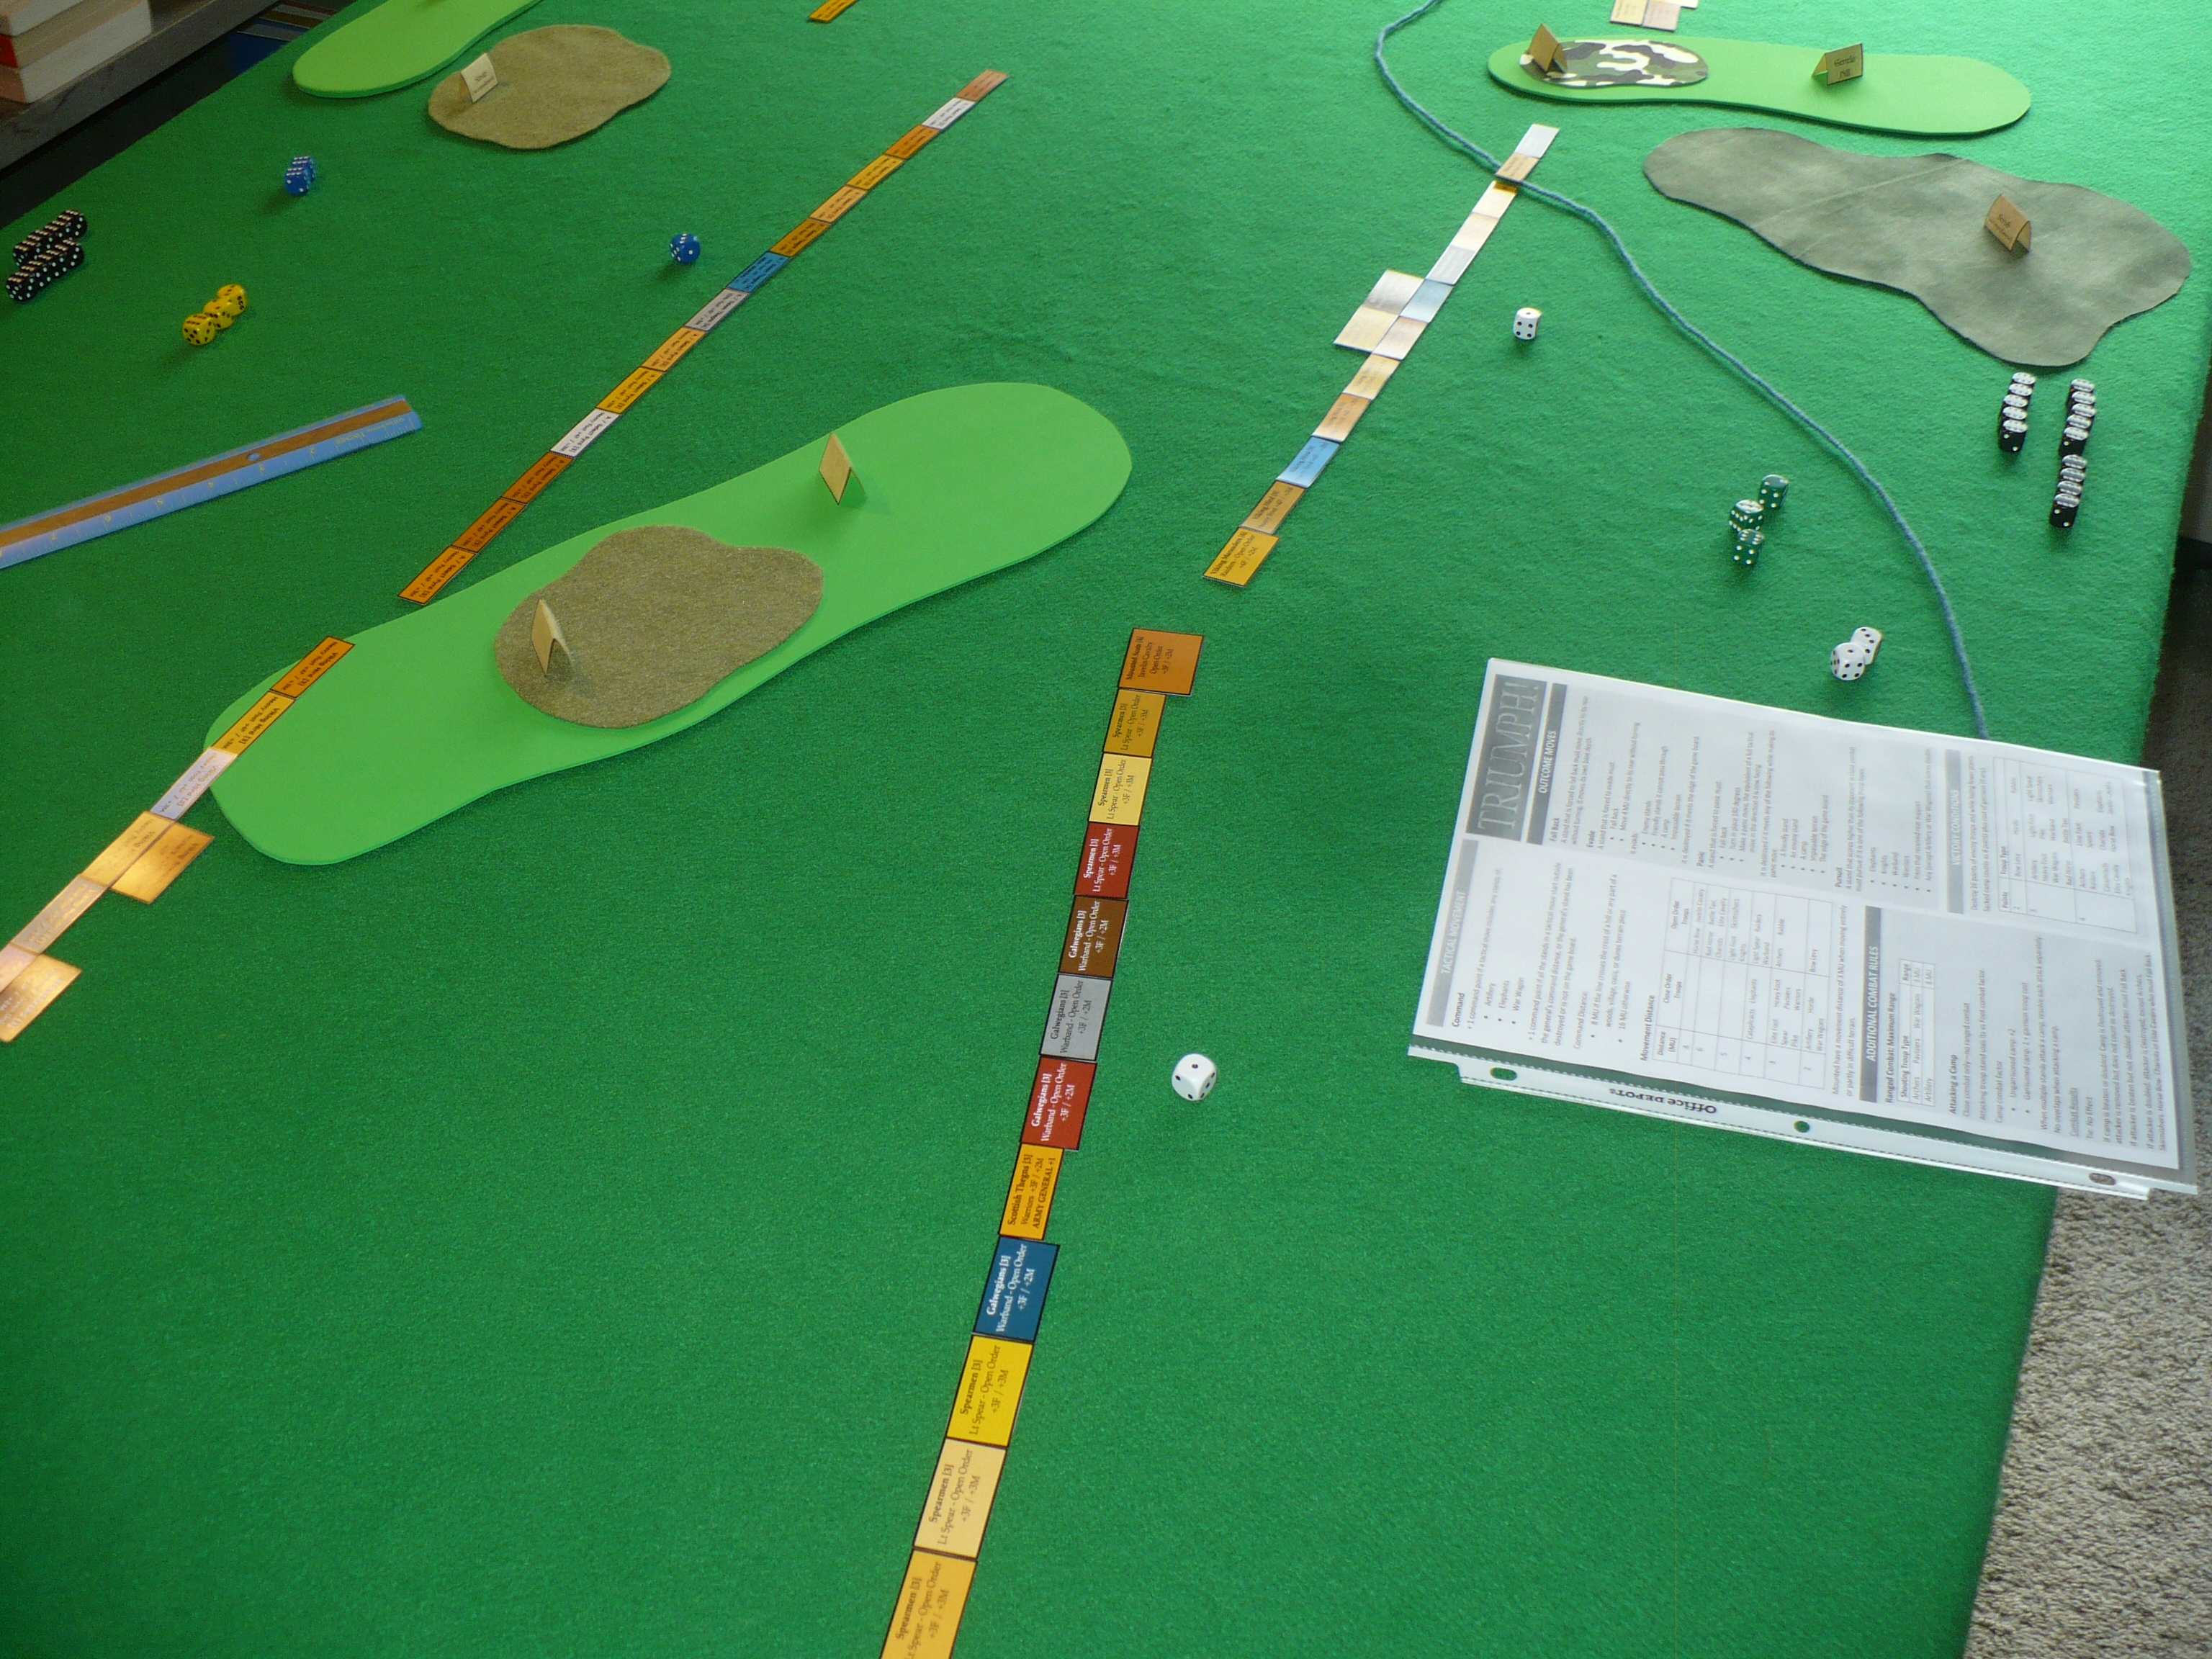
A close up showing the evolving contest between the Scots and the Vikings. The green and yellow dice indicate the final melee modifier, while the white and blue dice show the combat rolls made for the units involved. Here, the Galwegians are overlapped and so drop from a +3 to a +2. They roll a 1 on the white die and score a total of 3. By contrast, the Viking Hird have a +4 value, to which the 3 on the blue die is added. The Vikings have a 7 versus a paltry 3 for the Scots. The Galwegians are destroyed, and the Hird pursues due to the difference in the result.

Back over on the Saxon-Viking left flank, the Welsh are starting to make progress. Their warbands have pushed back a unit of Select Fyrd and are attacking the Saxon sub-general from the front and flank. The colored dice show the success of the Welsh Light Foot against some Saxon Rabble.

The desperate fighting continues between the Scots and the Vikings in this sector. This photo shows the Scots general (the commander of the “Triple Alliance”) being attacked on the flank by a unit of Viking Hird. The result of the added dice informs that the Scottish Thegns lost the melee. However, there is sufficient room for them to withdraw without bumping into a friendly unit. This withdrawal will open them up to another attack on the flank, unfortunately.

The Scots have lost their commander, and sufficient units to become demoralized. The black dice serve as a visual reminder of this status. Demoralized units fight with a negative modifier. Further, the ability of a commander is reduced when his force is demoralized. If the commander has been captured or killed, then command and control is, obviously, much more difficult.

This photo shows the status of the center of the battlefield near the end of the engagement. The “firework effect” is evident as the Vikings have had success against the Saxon left, while the Saxons have had success fighting the Viking left.

A melee that tipped the Vikings contingent of the “Alliance” over the edge. Here, Select Fyrd of the Saxon center have engaged an isolated unit of Viking Hird. (The melee just before this saw a unit of Viking Raiders, on the left of the Hird, destroyed.) The several dice show the clear if also deadly result for the Vikings. The Hird were destroyed/routed, and the unit of Select Fyrd will pursue.

The consequence of losing that unit of Hird results in the Viking contingent of the “Triple Alliance” becoming demoralized. This picture shows the black dice marking each demoralized unit. At the top of the photo, the pursuit of the victorious Select Fyrd unit can be seen.
Evaluation
Comparing this wargame to the previous effort, wherein I transported Pharsalus to mainland Europe in the fourteenth century, there is no question that the terrain was more “colorful” and complex. The opposing armies were certainly more “colorful” as well, though this assessment might be a matter for debate. Did the “improvement” of both terrain and troops provide or result in a better wargame experience? Again, this would seem a possible subject for debate or at least discussion. While certainly more functional, the unit counters were still a bit “fiddly.” This might be a product of their hasty production. There might be a scale issue here, as I am thinking that preparing counters with a universal 50 mm frontage or using the provided 60 mm dimensions would allow for easier manipulation.
As was the case with the previous engagement, there were no specific battle plans made by either side. The Saxons (with the exception of the contingent in front of Clarendon) and Vikings advanced to fight, while the Scots, Vikings, and Welsh did the same. An argument could be made that the recently concluded tabletop engagement was similar to that of historical Brunanburgh. Looking over the lines of the poem, I found this portion or excerpt: “. . . on the battlefield where banners crashed and spears clashed in that meeting of men, that weapon-wrestle, when on the death-field . . .” (Please see the Osbourne translation at https://thewildpeak.wordpress.com/2014/05/03/why-cant-we-still-speak-like-that-the-old-english-poem-the-battle-of-brunanburh/.)
I should like to think that I am getting more comfortable if not confident with these rules. Of course, I am sure that a few mistakes were made in this Dark Ages contest. However, I do not think that these errors swayed the fictional battle one way or the other. Tactically, the one gaffe that sticks out was when I committed a unit of Viking archers to close combat instead of having them stand back and loose a volley or two. Additionally, I left a unit of cavalry (Bad Horse, I think) stranded in an enemy ZOC. They were eventually attacked in the flank. This command decision was made, if memory serves, as the command die roll for that particular contingent was not sufficient to do all that was needed. With respect to rule questions or concerns, I only had one situation in which I was not entirely sure of the proper resolution. In this specific instance, a unit was attacked from the front as well as on its flank. Even with this disadvantage, the unit was able to rout the enemy to its front. I was not exactly sure what happened to the flanking enemy unit. I presumed that this unit would be pushed back. Again, my “confusion” on this point did not tilt the battle to one side or the other.
In summary, I think this quasi-Brunanburgh went well. I was distracted if not entertained for a total of three hours or so. I learned more about the TRIUMPH! rules, though not necessarily about how to be a better tabletop general. This experiment and experience also gave me a little more confidence as well as some ideas for future solo “miniature” wargames.
Notes
- Roy Boss, then the President of The Society of Ancients, pre-empted the editorial of the March-April 2020 issue of Slingshot with some very sad news: He notified readers and subscribers of the death of Patrick Waterson on 14 January of that year. To be certain, I did not know Patrick as well as Roy or other high-level or long-standing members of The Society did, but I would agree without reservation with the closing remarks made by Roy. He stated: “Patrick was a character of no small significance. The Society will miss him.” Then, in Issue 331 (July-August 2020), Professor Phil Sabin offered a more substantial remembrance of Patrick entitled “Honour and Loss.”
- As I studied the pictures and especially the map accompanying the Hail Caesar narrative, I could not help but notice that nearly half of the battlefield/tabletop was not used. In addition, there was a very nice looking model of a fortified village, but this too was not used or was left unoccupied. Evidently, the player-generals decided to offer battle on the ground in front of the built-up-area and fortifications. There appeared to be a couple of hills or ridges and a number of trees as well as one or two patches of scrub or vegetation. For the most part, the model field of battle looked fairly open. From what I could discover in my study of the H. Charlesworth diagrams (they were quite small and the identifying print was also rather tiny), there was a forest and ditch along or covering one short-edge of the field/tabletop and a shallow curve of the River Rother running along the other short-edge. It appeared that one army was positioned on a hill or at least a slope, while the other and more numerous army was stretched across a long-edge and needed to advance up the slope towards the smaller force.
- This 1979 book, written by the Charles Grant is, I would respectfully contend, a must-have for the library of any serious historical wargamer.
- See, for just a handful of examples, the following blogs: http://olicanalad.blogspot.com/2018/; http://keefsblog.blogspot.com/2016/; https://saskminigamer.blogspot.com/2011/; https://sgtsteiner.blogspot.com/; http://caliban-somewhen.blogspot.com/2017/05/jugurtha-versus-marius.html, and again, http://olicanalad.blogspot.com/2012/.
No comments:
Post a Comment